Create Random Post Slider Widget For BlogSpot Blogs!

Create Random Post Slider For Blogspot blogsEver wondered you could display images randomly inside a blogger slider? So far we have shared dynamic recent posts slider and a static slider, today for the first time online, we are releasing a Random Post Slider for BlogSpot blogs which is built using Blogger JSON Feeds API, FlexSlider and jQuery. A fully responsive image slider that will automatically display your random posts on your homepage or sidebar, almost anywhere you want.  Lets learn how to create a random slider for blogspot in simple steps but before that lets see a live demo!

What is Blogger Random Post Slider Widget?

Due to the natural structure of blogging platforms such as blogspot, articles end up being buried down once they get old. New users often avoid navigating through all your labels/categories, as a result most of your best content receives no attention at all. A random post slider is the best way to showcase your oldest posts to your visitors. The slider widget will pick your old posts randomly and automatically display the thumbnails either on homepage or sidebar depending on what location best suits you. The slider rotates in a clockwise direction where each slide is both responsive and dynamic.

Features of Blogger Random Post Slider Widget

Each slide will display useful data which is fetched using a JSON Call. Features supported include:

  • Article comments count,
  • Author avatar,
  • Author name,
  • Published date,
  • Labels,
  • Featured Thumbnail,
  • Third Party Thumbnail Support,
  • YouTube Thumbnail Support,
  • Editable Title,
  • Mobile responsive (Smartphones/ Tablets/ Laptops/ Desktop Screens supported)

Create and Random Post Slider in Blogger

Follow these easy steps:

  1. Go To Blogger > Template
  2. Backup your template
  3. Click "Edit HTML"
  4. Just below <head> tag paste the following JS and CSS source links:

    <script src='http://ajax.googleapis.com/ajax/libs/jquery/1/jquery.min.js' type='text/javascript'></script>
    <link href='http://fortawesome.github.io/Font-Awesome/assets/font-awesome/css/font-awesome.css' rel='stylesheet'/>
    <link href='http://fonts.googleapis.com/css?family=Oswald' rel='stylesheet' type='text/css'/>
    <link href='https://cdnjs.cloudflare.com/ajax/libs/flexslider/2.6.1/flexslider.min.css' rel='stylesheet' type='text/css'/>
    <script src='https://cdnjs.cloudflare.com/ajax/libs/flexslider/2.6.1/jquery.flexslider.min.js' type='text/javascript'></script>

    Note: Do not add JQuery, FontAwesome, FlexSlider or Oswald source links to your template if you are already using them on your site.

  5. Next search ]]></b:skin> and just above/before it paste the following code:

    /*######### Random Posts By MyBloggerTricks #############*/
    .mbt-random{margin:0 5px;border:0;width:100%;overflow:hidden}
    .mbt-random .slides{list-style-type:none;margin:0 auto;padding:0}
    .mbt-random li{color:#fff;font-family:helvetica;font-size:12px;overflow:hidden;padding-top:10px}
    .mbt-random .flex-control-nav li{display:inline-block;margin:0 2px}
    .mbt-random .flex-control-nav a{text-indent:9999px;display:block;width:10px;cursor:pointer;height:10px;background-color:#000;border:1px solid #000;border-radius:0!important}
    .flex-direction-nav .flex-prev{left:-50px}
    .flex-direction-nav .flex-next{right:-50px;text-align:right}
    .mbt-random .flex-control-paging{display:none}
    .flex-direction-nav{position:relative;top:-250px}
    .mbt-random .flex-control-nav a.flex-active{background-color:#84db06;border:1px solid #90f128}
    .mbt-random .flex-div{margin:0 auto;display:block;padding:0!important;position:relative;height:370px}
    .mbt-random li a{color:#0080ff;text-decoration:none}
    .mbt-random i{color:#999;padding-right:5px}
    .mbt-random .iline{line-height:2em;margin:0;position:relative;top:-90px;background:#56adff;padding:3px 10px;display:inline-block}
    .mbt-random .icontent{line-height:1.5em;margin-top:5px}
    .mbt-random div span{margin:0 5px 0 0;display:inline-block;font-weight:400}
    .mbt-random .mbttitle{font-family:oswald;font-size:20px;color:#fff;font-weight:400;text-decoration:none;position:relative;top:-90px;background:#66b5ff;padding:15px 10px;display:block}
    .mbt-random .mbttitle:hover,.mbt-random .itotal a:hover{color:#fff;text-decoration:none}
    .mbt-random .iedit a{text-decoration:none;color:#999;cursor:pointer}
    .mbt-random .iedit:before,.mbt-random .iauthor:before,.mbt-random .itag:before,.mbt-random .icomments:before,.mbt-random .idate:before,.mbt-random .itotal span:before{font-family:fontAwesome;position:relative;padding-right:8px;color:#fff}
    .mbt-random .iauthorpic{width:17px!important;height:17px!important;border-radius:50%;float:none;display:inline-block!important;margin:0;padding-right:3px;position:relative;top:3px}
    .mbt-random .iFeatured{overflow:hidden;position:relative;margin:0;padding:0;width:100%}
    .mbt-random .iFeatured a{background:none;padding:0;display:block;border:0px solid #eee;margin:0 -1px}
    .mbt-random .iFeatured img{height:305px!important;-moz-transition:all .3s;-webkit-transition:all .3s;transition:all .3s;border-radius:0;margin:0;padding:0;opacity:.7}
    .mbt-random .iFeatured:hover img{opacity:1;-moz-transform:scale(1.4);-webkit-transform:scale(1.4);transform:scale(1.4)}
    .mbt-random .icomments a, .mbt-random .itag a{color:#0080ce;font-family:arial;font-size:12px}
    .mbt-random .icomments a:hover, .mbt-random .itag a:hover{text-decoration:underline}
    .mbt-random .itag:before{content:'\f02c';padding:0 3px 0 7px;color:#fff}
    .mbt-random .icomments:before{content:'\f086';padding:0 3px 0 7px;color:#fff}
    .mbt-random .idate{color:#fff;padding:3px 4px;font-family:arial;font-size:11px}
    .mbt-random .idate:before{content:'\f073';padding:0 5px;color:#fff}

  6. Make these changes

    • To change the blue background color behind the title edit: #66b5ff
    • To change the light blue background behind Author name edit: #56adff
    • To change the white color of the Title text edit: #fff
    • To change the color of the comment and labels link edit: #0080ce
  7. Save your template.
  8. Now go to Blogger > Layout
  9. Select "Add a Gadget"
  10. Choose "HTML/JavaScript" gadget
  11. Keep the title field empty and then paste the following code inside it:

    <script type="text/javascript">
    //################### Defaults
    var ListBlogLink = "http://mybloggertricks.com";
    var ListCount = 4; 
    var TitleCount = 66;
    var ImageSize = 800;

    $(window).load(function() {
      $('.mbt-random').flexslider({
       animation: "slide",
        itemWidth: 600,
    itemMargin: 25,
      directionNav: true,
           touch: true,
           slideshowSpeed: 2500,
          pauseOnHover: true,
         animationSpeed: 700,
      });
    });

    var RandomArray = [];
    var TotalPosts  = 0;
    var RandomArray = new Array(ListCount);
    function TotalCount(json) {
        TotalPosts   = json.feed.openSearch$totalResults.$t
    }
    document.write('<script type=\"text/javascript\" src=\"'+ListBlogLink+'/feeds/posts/default?alt=json-in-script&callback=TotalCount\"><\/script>');

    function GenerateNum() {
        for (var i = 0; i < ListCount ; i++) {
        for (var j = 0; j < RandomArray.length; j++){
        var RandomNum = Math.floor(Math.random() * (TotalPosts ) + 1);
        RandomArray[i] = RandomNum; }
                                                                      }
    }

    </script>

    <div class="flexslider mbt-random">
    <ul class="slides">
    <script type="text/javascript">
    //################### Function Start
    function mbtrand(json) {
    for (var i = 0; i < json.feed.entry.length; i++)
    { 
    //################### Variables Declared
    var listing= ListImage = ListUrl = ListTitle = ListImage = ListContent = ListConten = ListAuthor = ListTag = ListDate = ListUpdate = ListComments = thumbUrl = TotalPosts = sk = AuthorPic= ListMonth = Y = D = M = m = YY = DD = MM = mm = TT =  "";
    //################### Category

    if (json.feed.entry[i].category != null)
    {
    for (var k = 0; k < json.feed.entry[i].category.length; k++) {
    ListTag += "<a href='"+ListBlogLink+"/search/label/"+json.feed.entry[i].category[k].term+"'>"+json.feed.entry[i].category[k].term+"</a>";
    if(k < json.feed.entry[i].category.length-1)
    { ListTag += ", ";}
    }
    }
    //################### URL
    for (var j = 0; j < json.feed.entry[i].link.length; j++) {
          if (json.feed.entry[i].link[j].rel == 'alternate') {
            break;
          }
        }
    ListUrl= "'" + json.feed.entry[i].link[j].href + "'";
    //################### Info
    TotalPosts = json.feed.openSearch$totalResults.$t;
    if (json.feed.entry[i].title!= null)
    {
    ListTitle= json.feed.entry[i].title.$t.substr(0, TitleCount);
    }
    if (json.feed.entry[i].thr$total)
    {
    ListComments= "<a href='"+json.feed.entry[i].link[j].href+"#comment-form'>"+json.feed.entry[i].thr$total.$t+"</a>";
    }
    ListAuthor= json.feed.entry[i].author[0].name.$t.split(" ");
    ListAuthor=ListAuthor.slice(0, 1).join(" ");
    AuthorPic = json.feed.entry[i].author[0].gd$image.src;
    //################### Date Format
    ListMonth= ["Jan", "Feb", "Mar", "Apr", "May", "Jun", "Jul", "Aug", "Sep", "Oct", "Nov", "Dec"];
    ListDate= json.feed.entry[i].published.$t.substring(0,10);
                             Y = ListDate.substring(0, 4);
                            m = ListDate.substring(5, 7);
                             D = ListDate.substring(8, 10);
                             M = ListMonth[parseInt(m - 1)];                      
    ListUpdate= json.feed.entry[i].updated.$t.substring(0, 16);
                             YY = ListUpdate.substring(0, 4);
                            mm = ListUpdate.substring(5, 7);
                             DD = ListUpdate.substring(8, 10);
                             TT = ListUpdate.substring(11, 16);
                             MM = ListMonth[parseInt(mm - 1)];  
    //################### Thumbnail Check

    if (json.feed.entry[i].media$thumbnail)
    {
    thumbUrl = json.feed.entry[i].media$thumbnail.url;
    sk= thumbUrl.replace("/s72-c/","/s"+ImageSize+"/");
    ListImage= "'" + sk.replace("?imgmax=800","") + "'";
    }

    // YouTube scan
    else if (json.feed.entry[i].content.$t.match(/youtube\.com.*(\?v=|\/embed\/)(.{11})/) != null)
    {
        var youtube_id = json.feed.entry[i].content.$t.match(/youtube\.com.*(\?v=|\/embed\/)(.{11})/).pop();
       
        if (youtube_id.length == 11) {
            var ListImage = "'//img.youtube.com/vi/"+youtube_id+"/0.jpg'";
            }
    }

    else if (json.feed.entry[i].content.$t.match(/src=(.+?[\.jpg|\.gif|\.png]")/) != null)
    {
    // Support For 3rd Party Images
    ListImage =  json.feed.entry[i].content.$t.match(/src=(.+?[\.jpg|\.gif|\.png]")/)[1];
    }
    else
    {
    ListImage= "'https://blogger.googleusercontent.com/img/b/R29vZ2xl/AVvXsEgtm0maNUr06C_jCvhDoLUkVnptgdxcrDZZu6uXi9IGh6IreJpMcY7Vcs4HP-ynBx46v8dBcA6Lk4Jhoy0TGbObxeJt3O6fnk1iWw1OAgEOBPQZQBEosJkkxc6iVuTMKCMa70UGC7-K9Do/s200/Icon.png'";
    }
    //###################  Printing List
    var listing = "<li><div class='flex-div'><div class='iFeatured'><a  href="
    + ListUrl+
      "><img src="
    +ListImage+
    "/></a></div><div class='iline'><span class='iauthor'><img class='iauthorpic' src='"+AuthorPic+"'/>"
    +ListAuthor+
    "</span><span class='icomments'>"
    +ListComments +
    "</span> <span class='idate'>"
    + D +
    " "
    + M +
    "</span><span class='itag'>"
    +ListTag +
    "</span></div><a class='mbttitle' href="
    +ListUrl+
    "target='_blank'>"
    +ListTitle+
    "</a></div></li>";

    document.write(listing);

    } }
    <!-- #### Invoking the Callback Function #### -->
    for (var i = 0; i < ListCount ; i++) {
    GenerateNum();
    var scripta = '<script type=\"text/javascript\" src=\"'+ListBlogLink+'/feeds/posts/default?alt=json-in-script&start-index='+RandomArray[i] + '&max-results=1&callback=mbtrand\"><\/script>';
    document.write(scripta);
    };

    </script>
    </ul></div>

    Make these changes to customize the slider:

    • Place your blog URL inside ListBlogLink
    • Inside ListCount  mention how many slides to display. I recommend not displaying more than 3 or 4 slides. Increasing this number will increase the number of iterations/loops and thus slowing down your site.
    • Inside TitleCount  mention the length of title characters to display. By default titles longer than 66 characters will be trimmed.
    • Inside ImageSize mention the aspect ratio or resolution of your featured thumbnails. By default the thumbnails will be 800px in width. If you wish to display the slider in sidebar only then you can decrease this value to 400px.
  12. Click Save and you are all done!

You have now successfully created blogger random post slider and have installed it on your blog template. Visit your blog to see it working just fine. If in case you troubleshoot yourself, feel free to leave your comments below and I would love to help you with all your queries.

I have installed a random post widget on my blog slider and so far it has really helped growing our audience. I wish this slider may help you equally. This is the first random slider widget of its kind published online for blogger blogs therefore do let us know how useful is this slider for you and what is your experience after installing it successfully on your template. Peace buddies! :)

If you are interested to learn how are blogger widgets developed and coded then do read:

Blogger Image Slider - Display Featured Posts in BlogSpot!

Blogger Image Slider - Static and ResponsiveWe have so far discussed different types of dynamic sliders and carousels for blogspot blogs but since some of you requested a static image slider where you could display featured posts based on your selection, so I thought of sharing a jQuery Static Image Slider where you can add custom info to feature your favorite blog posts on your homepage. If in case you want to display images automatically based on a specific label please check: Dynamic Blogger Slider.

Lets See a Demo first:

What is a Blogger Image Slider?

Blogger Image sliders (also known as image carousels or slideshows) is the best way to display multiple images, videos, or graphics on your website. Featured images that users can slide or swipe can draw new visitors into your site, capturing their attention immediately thus bringing you more pageviews and revenue.

Blogger Image sliders can be static or dynamic.

  1. STATIC IMAGE SLIDER: In a static slider that we are discussing today, you can manually add images based on your selection. Example: 4+ jQuery Image Sliders, Image Slideshow, the slider being discussed today.
  2. DYNAMIC IMAGE SLIDER: In a dynamic slider such as Blogger carousel or Recent posts slider that we released earlier, images are automatically displayed by pulling the latest posts from a specific blog label mentioned by you. Example: Dynamic Image Slider, Blogger Carousel

Responsive By Default

Blogger Image Slider is built using FlexSlider and it is by default Mobile responsive and fluid. It adapts automatically to different device screen sizes. See the screenshots below

[ SMARTPHONES ]

responsive slider for Smartphone

[ TABLETS / IPADS]

responsive slider for tablets

[ DESKTOP / LAPTOPS ]

responsive image slider for blogger

Add Blogger Image Slider To Your Blog

Follow the easy steps below to add this cool responsive blogger image slider to your templates.

  1. Go To Blogger > Template
  2. Backup your template
  3. Click "Edit HTML"
  4. Just below <head> tag paste the following JS and CSS source links:

    <script src='http://ajax.googleapis.com/ajax/libs/jquery/1/jquery.min.js' type='text/javascript'></script>
    <link href='http://fortawesome.github.io/Font-Awesome/assets/font-awesome/css/font-awesome.css' rel='stylesheet'/>
    <link href='http://fonts.googleapis.com/css?family=Oswald' rel='stylesheet' type='text/css'/>
    <link href='https://cdnjs.cloudflare.com/ajax/libs/flexslider/2.6.1/flexslider.min.css' rel='stylesheet' type='text/css'/>
    <script src='https://cdnjs.cloudflare.com/ajax/libs/flexslider/2.6.1/jquery.flexslider.min.js' type='text/javascript'></script>

    Note: Do not add JQuery, FontAwesome, FlexSlider or Oswald source links to your template if you are already using them on your site.

  5. Next search ]]></b:skin> and just above/before it paste the following code:

    /*######### Blogger Image Slider By MyBloggerTricks #############*/
    .mbt-s{margin:0 5px;border:0;width:100%;overflow:hidden}
    .mbt-s .slides{list-style-type:none;margin:0 auto;padding:0}
    .mbt-s li{color:#fff;font-family:helvetica;font-size:12px;overflow:hidden;padding-top:10px}
    .mbt-s .flex-control-nav li{display:inline-block;margin:0 2px}
    .mbt-s .flex-control-nav a{text-indent:9999px;display:block;width:10px;cursor:pointer;height:10px;background-color:#000;border:1px solid #000;border-radius:0!important}
    .flex-direction-nav .flex-prev{left:-50px}
    .flex-direction-nav .flex-next{right:-50px;text-align:right}
    .mbt-s .flex-control-paging{display:none}
    .flex-direction-nav{position:relative;top:-250px}
    .mbt-s .flex-control-nav a.flex-active{background-color:#84db06;border:1px solid #90f128}
    .mbt-s .flex-div{margin:0 auto;display:block;padding:0!important;position:relative;height:370px}
    .mbt-s li a{color:#0080ff;text-decoration:none}
    .mbt-s i{color:#999;padding-right:5px}
    .mbt-s .iline{line-height:2em;margin:0;position:relative;top:-87px;background:#31363a;padding:3px 10px;display:inline-block}
    .mbt-s .icontent{line-height:1.5em;margin-top:5px}
    .mbt-s div span{margin:0 5px 0 0;display:inline-block;font-weight:400}
    .mbt-s .mbttitle{font-family:oswald;font-size:20px;color:#ff0;font-weight:400;text-decoration:none;position:relative;top:-90px;background:#222;padding:15px 10px;display:block}
    .mbt-s .mbttitle:hover,.mbt-s .itotal a:hover{color:#fff;text-decoration:none}
    .mbt-s .iedit a{text-decoration:none;color:#999;cursor:pointer}
    .mbt-s .iedit:before,.mbt-s .iauthor:before,.mbt-s .itag:before,.mbt-s .icomments:before,.mbt-s .idate:before,.mbt-s .itotal span:before{font-family:fontAwesome;position:relative;padding-right:8px;color:#fff}
    .mbt-s .iauthorpic{width:17px!important;height:17px!important;border-radius:50%;float:none;display:inline-block!important;margin:0;padding-right:3px;position:relative;top:3px}
    .mbt-s .iFeatured{overflow:hidden;position:relative;margin:0;padding:0;width:100%}
    .mbt-s .iFeatured a{background:none;padding:0;display:block;border:0px solid #eee;margin:0 -1px}
    .mbt-s .iFeatured img{height:305px!important;-moz-transition:all .3s;-webkit-transition:all .3s;transition:all .3s;border-radius:0;margin:0;padding:0;opacity:.7}
    .mbt-s .iFeatured:hover img{opacity:1;-moz-transform:scale(1.4);-webkit-transform:scale(1.4);transform:scale(1.4)}
    .mbt-s .icomments a{color:#0080ff;font-family:arial;font-size:12px}
    .mbt-s .icomments a:hover{text-decoration:underline}
    .mbt-s .icomments:before{content:'\f086';padding:0 3px 0 7px;color:#fff}
    .mbt-s .idate{color: #ff0;padding: 9px 10px;font-family: Oswald;
        font-size: 12px;position: relative;top: -270px; left:-80px;
        background: #222;width: 23px;text-align: center;line-height: 1.8em;}
    .mbt-s .idate b{font-size:17px;}

  6. Make these changes

    • To change the black background color behind the title and date edit: #222
    • To change the yellow color of the slide title and date font edit: #ff0
    • To change the color of the comment link edit: #0080ff
  7. Save your template.
  8. Now go to Blogger > Layout
  9. Select "Add a Gadget"
  10. Choose "HTML/JavaScript" gadget
  11. Keep the title field empty and then paste the following code inside it:

    <script type="text/javascript">
    $(window).load(function() {
      $('.mbt-s').flexslider({
    animation: "slide",itemWidth: 600,itemMargin: 25,directionNav: true,touch: true,slideshowSpeed: 2500,pauseOnHover: true,animationSpeed: 700,});});

    </script>

    <div class="flexslider mbt-s">
    <ul class="slides">

    <!-- SLIDE 1 -->

    <li>
    <div class="flex-div">
    <div class="iFeatured">
    <a href="POST LINK"><img src="POST IMAGE" /></a></div>
    <div class="iline"><span class="iauthor"><img class="AUTHOR IMAGE" />AUTHOR NAME</span><span class="icomments"><a href="#comment-form">COMMENTS COUNT</a></span> </div><span class="idate">Jun <b>10</b></span><a class="mbttitle" href="POST LINK" target="_blank">POST TITLE</a>
    </div>
    </li>

    <!-- SLIDE 2 -->

    <li>
    <div class="flex-div">
    <div class="iFeatured">
    <a href="POST LINK"><img src="POST IMAGE" /></a></div>
    <div class="iline"><span class="iauthor"><img class="AUTHOR IMAGE" />AUTHOR NAME</span><span class="icomments"><a href="#comment-form">COMMENTS COUNT</a></span> </div><span class="idate">Jun <b>10</b></span><a class="mbttitle" href="POST LINK" target="_blank">POST TITLE</a>
    </div>
    </li>

    <!-- SLIDE 3 -->

    <li>
    <div class="flex-div">
    <div class="iFeatured">
    <a href="POST LINK"><img src="POST IMAGE" /></a></div>
    <div class="iline"><span class="iauthor"><img class="AUTHOR IMAGE" />AUTHOR NAME</span><span class="icomments"><a href="#comment-form">COMMENTS COUNT</a></span> </div><span class="idate">Jun <b>10</b></span><a class="mbttitle" href="POST LINK" target="_blank">POST TITLE</a>
    </div>
    </li>

    </ul></div>

  12. The above code will help you create three image slides. Each slide has the same code. You just need to change the required fields in this format:
    • Replace POST LINK with Post URL. It must start with http://
    • Replace POST IMAGE with the thumbnail URL. Make sure your image should be at least 600px in width.
    • Replace AUTHOR IMAGE with author image URL also called author avatar or profile image. This image could have a small size, say for instance less than 50px in width and height. Same size for width and height.
    • Replace AUTHOR NAME with author name of that post.
    • Replace COMMENTS COUNT with how many comments are posted on that post.
    • Replace Jun and 10 with month and day respectively of published date.
    • Replace POST TITLE with the textual title of the post.
    • To add an additional slide simply copy the slide code starting from <li> and ending at </li> and paste it just above </ul></div>.
  13. Finally click save your widget and you are all done!

Need help in installing Image Slider?

In my next post I will share how to create a dynamic random post slider for the first time with all of you. For the time being do kindly share your feedback on this static one. Let me know if you need any help or assistance by leaving your comments. I hope this slider will help you better feature your content on your homepage to engage your blog visitors even more. Wish you a great blogging experience. Peace buddies! :)

How to Know if You�re Hiring a Reputable Web Design Agency?

How to hire a web design agencyAfter the launch of our web development and mobile app development agency, many of you asked us how to know if a web design company can be trusted and what are some of the things that must be kept in mind while hiring a reputable web design agency that may provide high quality service at a competitive price. Did you know there are over one billion websites on the world wide web? While each of these websites has its own design, it goes without saying that some are better than others. A good web design requires a good team of web designers. Today we will discuss in detail five basic advices that  would help you to kick start your online business without worrying about the challenges that come during the web design process.

Just recently several of my friends kick started their online business firms, some of them are located in USA, Australia and UK. I asked one of my friends who recently started Sydney web design agency in Australia and took his advice on how to identify trustworthy web design agencies from those which are unprofessional or untrustworthy. I also asked some of my colleagues in USA who work with different software houses for their precious views and advices. Based on this research I am sharing below five points of experienced and credible advice that will point you towards the right provider.


1. Visit Their Website!

view their websiteIt doesn�t get any easier than this. Visit the website of the company you are considering. While there, focus on everything from the layout to the color scheme. If you like what you see, you�re on the right track. If you don�t, it�s time to move on.

2. Read Customer Reviews

read customer reviewsIn today�s day and age, it�s easier than ever to dig up information on any type of company. This is particularly true of web design agencies, where it seems like the top providers have five star reviews spanning many rating services. Positive reviews will go a long way in putting your mind at ease.

3. Ask For References

The best web design companies have no problem providing several references. In fact, they�ll want you to check with past clients before moving forward.

Ask for references

Conversely, there are companies that do whatever they can to steer you away from this. Rather than provide references, they come up with a variety of excuses as to why they are unable to do so.

4. Discuss The Details

Even if you aren�t part of the web design industry, it never hurts to become familiar with the lingo. As you discuss your project with the company, this will allow you to better understand if they truly know what they�re talking about.

Discuss the details

From above the fold to XHTML, there are plenty of words and phrases that the top web design agencies will throw into the conversation. You may not understand each one, but this shows that the company is knowledgeable on their subject matter.

5. It�s Not All About Price

There is no denying the fact that you want to find a web design agency that provides high quality results at an affordable price.

It's not all about price

However, there�s something you need to remember: it�s not all about the money. If a company continually talks about price, telling you that they are cheaper than the competition, it should throw up a red flag. The cost to build a website can and will differ based on a variety of factors, from the scope of the project to the functionality to the programming. There will come a time when you talk numbers, but this shouldn�t be the end all.

Conclusion

Regardless of your industry or goals, it�s important to have a high quality website design that impresses your customers and prospects. There are many visually appealing designs out there, all of which can give you the inspiration you need. Once you have a basic idea of what you�re looking for, you can then begin your search for a web design agency. With the above advice guiding you, you�ll find it easier to compare companies in an attempt to make a decision that will suit you well.

Even if you�re in a hurry, even if you�re working on a tight budget, you never want to hire �just any� web design agency. This is an important decision, so you should treat it as such.  I hope these tips and advices may help you in making the right decision. Let me know if you have any queries :)

Blogger Slider: Display Recent Posts Dynamically

dynamic blogger sliderEver wondered how to display your most recent posts from a selected category inside a dynamic Image slider? Lets create a responsive content slider for BlogSpot blogs that may display recent posts from a specific label automatically. Without our Blogger JSON Feeds guide, building blogspot widgets would not have been that easy!

UPDATE: We just released Random Posts Slider Widget and a Static Slider For Blogger!

Image Sliders for blogs play a vital role in showcasing your featured content whether it be a static list of featured images linked to your bog posts or a dynamic/automatic list of recent posts from a specific label or a automatic list of random posts. We are sharing with you all for the first time, all these three amazing blogger sliders built using FlexSlider and Blogger JSON Feeds API. These blogspot widgets are rarely shared with all advanced functionality and we are pleased to develop them exclusively for blogger community. 

In the past we have developed and shared several static Content Sliders for blogspot blogs but this time we will learn how to make that content load dynamically instead of manually creating the featured content list and then displaying it.

See our previous sliders by following these links:

Features of Blogger Slider

Blogger Slider is an advanced widget equipped with these features:

  1. Author Avatar - Unique!
  2. Displays recent posts dynamically inside Slider. - Unique!
  3. Displays recent posts from a specific category/label.
    1. Slider with two animations: Slide & Fade - Unique!
    2. Clickable Comments Count
    3. Custom Date Format
    4. Clickable Animated Featured Image Thumbnails
    5. Option to increase or decrease Image Resolution for quality- Unique!
    6. Support for Third-party Images and YouTube Video thumbnails - Unique!
    7. Title Length is adjustable

    Most Responsive Content Slider For Blogger Blogs!

    Blogger slider is built using FlexSlider and it therefore automatically adopts the width of the parent container. Multiple breakpoints are added to ensure the slider fits to device screen size just perfectly. See the screenshots below

    [ SMARTPHONES ]

    responsive blogger slider


    [ TABLETS / IPADS]

    responsive blogspot slider


    [ DESKTOP / LAPTOPS ]

    responsive blogspot content slider

    Add Blogger Slider To Your Blogspot Template

    Follow these simple steps:

    1. Go To Blogger > Template
    2. Backup your template
    3. Click "Edit HTML"
    4. Just below <head> tag paste the following JS and CSS source links:

      <script src='http://ajax.googleapis.com/ajax/libs/jquery/1/jquery.min.js' type='text/javascript'></script>
      <link href='http://fortawesome.github.io/Font-Awesome/assets/font-awesome/css/font-awesome.css' rel='stylesheet'/>
      <link href='http://fonts.googleapis.com/css?family=Oswald' rel='stylesheet' type='text/css'/>
      <link href='https://cdnjs.cloudflare.com/ajax/libs/flexslider/2.6.1/flexslider.min.css' rel='stylesheet' type='text/css'/>
      <script src='https://cdnjs.cloudflare.com/ajax/libs/flexslider/2.6.1/jquery.flexslider.min.js' type='text/javascript'></script>

      Note: Do not add JQuery, FontAwesome, FlexSlider or Oswald source links to your template if you are already using them on your site.

    5. Next search ]]></b:skin> and just above/before it paste the following code:


      /*######### Blogger Slider By MyBloggerTricks #############*/
      .mbt-s{margin:0 5px;border:0;width:100%;overflow:hidden}
      .mbt-s .slides{list-style-type:none;margin:0 auto;padding:0}
      .mbt-s li{color:#fff;font-family:helvetica;font-size:12px;overflow:hidden;padding-top:10px}
      .mbt-s .flex-control-nav li{display:inline-block;margin:0 2px}
      .mbt-s .flex-control-nav a{text-indent:9999px;display:block;width:10px;cursor:pointer;height:10px;background-color:#000;border:1px solid #000;border-radius:0!important}
      .flex-direction-nav .flex-prev{left:-50px}
      .flex-direction-nav .flex-next{right:-50px;text-align:right}
      .mbt-s .flex-control-paging{display:none}
      .flex-direction-nav{position:relative;top:-250px}
      .mbt-s .flex-control-nav a.flex-active{background-color:#84db06;border:1px solid #90f128}
      .mbt-s .flex-div{margin:0 auto;display:block;padding:0!important;position:relative;height:370px}
      .mbt-s li a{color:#0080ff;text-decoration:none}
      .mbt-s i{color:#999;padding-right:5px}
      .mbt-s .iline{line-height:2em;margin:0;position:relative;top:-90px;background:#31363a;padding:3px 10px;display:inline-block}
      .mbt-s .icontent{line-height:1.5em;margin-top:5px}
      .mbt-s div span{margin:0 5px 0 0;display:inline-block;font-weight:400}
      .mbt-s .mbttitle{font-family:oswald;font-size:20px;color:#ff0;font-weight:400;text-decoration:none;position:relative;top:-90px;background:#222;padding:15px 10px;display:block}
      .mbt-s .mbttitle:hover,.mbt-s .itotal a:hover{color:#fff;text-decoration:none}
      .mbt-s .iedit a{text-decoration:none;color:#999;cursor:pointer}
      .mbt-s .iedit:before,.mbt-s .iauthor:before,.mbt-s .itag:before,.mbt-s .icomments:before,.mbt-s .idate:before,.mbt-s .itotal span:before{font-family:fontAwesome;position:relative;padding-right:8px;color:#fff}
      .mbt-s .iauthorpic{width:17px!important;height:17px!important;border-radius:50%;float:none;display:inline-block!important;margin:0;padding-right:3px;position:relative;top:3px}
      .mbt-s .iFeatured{overflow:hidden;position:relative;margin:0;padding:0;width:100%}
      .mbt-s .iFeatured a{background:none;padding:0;display:block;border:0px solid #eee;margin:0 -1px}
      .mbt-s .iFeatured img{height:305px!important;-moz-transition:all .3s;-webkit-transition:all .3s;transition:all .3s;border-radius:0;margin:0;padding:0;opacity:.7}
      .mbt-s .iFeatured:hover img{opacity:1;-moz-transform:scale(1.4);-webkit-transform:scale(1.4);transform:scale(1.4)}
      .mbt-s .icomments a{color:#0080ff;font-family:arial;font-size:12px}
      .mbt-s .icomments a:hover{text-decoration:underline}
      .mbt-s .icomments:before{content:'\f086';padding:0 3px 0 7px;color:#fff}
      .mbt-s .idate{color:#fff;padding:3px 4px;font-family:arial;font-size:11px}
      .mbt-s .idate:before{content:'\f073';padding:0 5px;color:#fff}

    6. Make these changes

      • To change the black background color behind the title edit: #222
      • To change the yellow color of the slide title font edit: #ff0 and to change the white color of the title on mouse hover edit: #fff
      • To change the color of the comment link eidt: #0080ff
      • The color can be in rgb or #hexadecimal, both work. Use our  Color Code Generator.
    7. Save your template.
    8. Now go to Blogger > Layout
    9. Select "Add a Gadget"
    10. Choose "HTML/JavaScript" gadget
    11. Keep the title field empty and then paste the following code inside it:

      <script type="text/javascript">
      $(window).load(function() {
        $('.mbt-s').flexslider({
      animation: "slide",itemWidth: 600,itemMargin: 25,directionNav: true,touch: true,slideshowSpeed: 2500,pauseOnHover: true,animationSpeed: 700,});});</script>

      <div class="flexslider mbt-s">
      <ul class="slides">
      <script type="text/javascript">
      //################### Defaults
      var ListBlogLink = "http://mybloggertricks.com";
      var ListCount = 6;
      var ListLabel = "Events";
      var TitleCount = 66;
      var ImageSize = 600;
      //################### Function Start
      function mbtslide(json) {
      for (var i = 0; i < ListCount; i++)
      { 
      //################### Variables Declared
      var listing= ListImage = ListUrl = ListTitle = ListImage = ListContent = ListConten = ListAuthor = ListTag = ListDate = ListUpdate = ListComments = thumbUrl = TotalPosts = sk = AuthorPic= ListMonth = Y = D = M = m = YY = DD = MM = mm = TT =  "";
      //################### Category
      if (json.feed.entry[i].category != null)
      {
      for (var k = 0; k < json.feed.entry[i].category.length; k++) {
      ListTag += "<a href='"+ListBlogLink+"/search/label/"+json.feed.entry[i].category[k].term+"'>"+json.feed.entry[i].category[k].term+"</a>";
      if(k < json.feed.entry[i].category.length-1)
      { ListTag += " ";}
      }
      }
      //################### URL
      for (var j = 0; j < json.feed.entry[i].link.length; j++) {
            if (json.feed.entry[i].link[j].rel == 'alternate') {
              break;
            }
          }
      ListUrl= "'" + json.feed.entry[i].link[j].href + "'";
      //################### Info
      TotalPosts = json.feed.openSearch$totalResults.$t;
      if (json.feed.entry[i].title!= null)
      {
      ListTitle= json.feed.entry[i].title.$t.substr(0, TitleCount);
      }
      if (json.feed.entry[i].thr$total)
      {
      ListComments= "<a href='"+json.feed.entry[i].link[j].href+"#comment-form'>"+json.feed.entry[i].thr$total.$t+"</a>";
      }
      ListAuthor= json.feed.entry[i].author[0].name.$t.split(" ");
      ListAuthor=ListAuthor.slice(0, 1).join(" ");
      AuthorPic = json.feed.entry[i].author[0].gd$image.src;
      //################### Date Format
      ListMonth= ["Jan", "Feb", "Mar", "Apr", "May", "Jun", "Jul", "Aug", "Sep", "Oct", "Nov", "Dec"];
      ListDate= json.feed.entry[i].published.$t.substring(0,10);
                               Y = ListDate.substring(0, 4);
                              m = ListDate.substring(5, 7);
                               D = ListDate.substring(8, 10);
                               M = ListMonth[parseInt(m - 1)];                      
      ListUpdate= json.feed.entry[i].updated.$t.substring(0, 16);
                               YY = ListUpdate.substring(0, 4);
                              mm = ListUpdate.substring(5, 7);
                               DD = ListUpdate.substring(8, 10);
                               TT = ListUpdate.substring(11, 16);
                               MM = ListMonth[parseInt(mm - 1)];  
      //################### Thumbnail Check

      if (json.feed.entry[i].media$thumbnail)
      {
      thumbUrl = json.feed.entry[i].media$thumbnail.url;
      sk= thumbUrl.replace("/s72-c/","/s"+ImageSize+"/");
      ListImage= "'" + sk.replace("?imgmax=800","") + "'";
      }

      // YouTube scan
      else if (json.feed.entry[i].content.$t.match(/youtube\.com.*(\?v=|\/embed\/)(.{11})/) != null)
      {
          var youtube_id = json.feed.entry[i].content.$t.match(/youtube\.com.*(\?v=|\/embed\/)(.{11})/).pop();
         
          if (youtube_id.length == 11) {
              var ListImage = "'//img.youtube.com/vi/"+youtube_id+"/0.jpg'";
              }
      }

      else if (json.feed.entry[i].content.$t.match(/src=(.+?[\.jpg|\.gif|\.png]")/) != null)
      {
      // Support For 3rd Party Images
      ListImage =  json.feed.entry[i].content.$t.match(/src=(.+?[\.jpg|\.gif|\.png]")/)[1];
      }
      else
      {
      ListImage= "'https://blogger.googleusercontent.com/img/b/R29vZ2xl/AVvXsEgtm0maNUr06C_jCvhDoLUkVnptgdxcrDZZu6uXi9IGh6IreJpMcY7Vcs4HP-ynBx46v8dBcA6Lk4Jhoy0TGbObxeJt3O6fnk1iWw1OAgEOBPQZQBEosJkkxc6iVuTMKCMa70UGC7-K9Do/s200/Icon.png'";
      }
      //###################  Printing List
      var listing = "<li><div class='flex-div'><div class='iFeatured'><a  href="
      + ListUrl+
        "><img src="
      +ListImage+
      "/></a></div><div class='iline'><span class='iauthor'><img class='iauthorpic' src='"+AuthorPic+"'/>"
      +ListAuthor+
      "</span><span class='icomments'>"
      +ListComments +
      "</span> <span class='idate'>"
      + D +
      " "
      + M +
      "</span></div><a class='mbttitle' href="
      +ListUrl+
      "target='_blank'>"
      +ListTitle+
      "</a></div></li>";

      document.write(listing);

      } }
      <!-- #### Invoking the Callback Function #### -->
      document.write("<script src='"+ListBlogLink+"/feeds/posts/default/-/"+ListLabel+"?alt=json-in-script&callback=mbtslide'></"+"script>");
      </script>
      </ul></div>

      Changing the following control options will help you customize blogger sider:

      • animation: You can select two values here. "slide" or "fade"
      • slideshowSpeed: You can set the speed of the slideshow cycling, in milliseconds
      • animationSpeed: You can also set the speed of animations, in milliseconds
      • pauseOnHover: Pause the slideshow when hovering over slider, then resume when no longer hovering
      • If you don't want to use the title then delete the yellow highlighted code.
      • ListBlogLink : Insert your Blog URL here
      • ListCount : Decide how many posts do you wish to display.
      • ListLabel : Insert your blog label here. Remember that labels are case sensitive. Therefore type it exactly as it is shown in your browser address bar.
      • TitleCount : Choose how many characters to display in slide title.
      • ImageSize : You can control the resolution or aspect ratio of thumbnails by editing ImageSize = 600; where the value 600 means that you want your images to be within 600 x 600 pixels in dimension.
      • /-/"+ListLabel+" Delete this line if you wish to display latest posts of your blog without mentioning a label
    12. Click Save and you are all done!

    Need Help In Installation of Blogger Slider?

    I just hope you may find this cool slider widget useful and easy to apply. Let me know if you need any help during the installation process of this content slider. You are most welcomed to post your questions in the comment box below. In our next tutorials we will share how to create Random Posts Content Slider for blogger.

    Stay tuned and keep customizing your blog to take it to the next level! =)

    How To Setup AdSense Matched Content Unit in BlogSpot?

    Setup Adsense Matched Content Unit in BlogSpot blogs

    In 2005 Google Introduced Matched content to help publishers promote their website content to their visitors. AdSense Matched content is actually a content recommendation tool that shows related posts to your readers. It generates contextually relevant article recommendations from the pages on your blog by displaying thumbnails. In other words it helps your blog visitors to discover relevant articles on your blog. It is a Google version of the Related Posts Widget that we use in blogspot and wordpress blogs.

    By setting up matched content on our blogspot blog, we did not only helped our readers to discover related content on our site but we also succeeded in generating more pageviews, lower bounce rate and some extra ad impressions thanks to its native ads option.

    Matched Content unit surely engages your website visitors to spend more time on your blog and thus helps you with higher page views and of course more ad revenue if you monetize it. See a live demo of Matched Content  in action at the bottom of this tutorial [Scroll down].

    Matched Content Display Sizes

    Matched content and Ads are displayed in two types either:

    1. Responsive Size: Related content is displayed horizontally inside a responsive carousel slider with Next/Previous buttons
    2. Fixed Size: A custom size matched content will display recommendations inside a Grid or fixed size slider.

    Responsive Size:

    Note: You can use responsive size only if your blogspot template is mobile responsive. Make your template responsive by reading this interesting and easy guide:

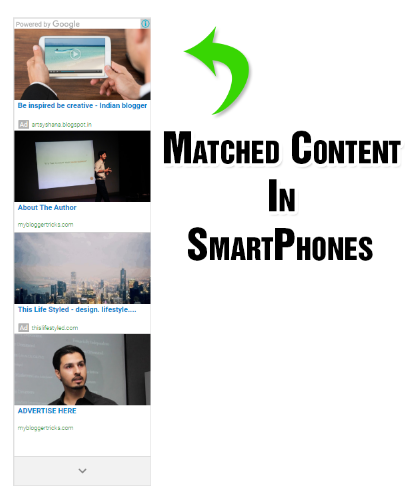
    Matched Content is displayed inside a responsive horizontal slider in Desktop/Laptop screens but displayed inside a vertical slider in Smartphone/Tablet/IPad screens. The Ads are distinguished from the related content using the "Ad" label.

    Matched Content View In Desktop / LaptopMatched Content View In Desktop / Laptop

    Matched Content View In Tablet / Large Smartphones

    Matched Content View In Tablet / Large Smartphones

    Matched Content View In Smartphones

    Adsense  Matched Content View In Smartphones

    Fixed Size:

    A fixed size Matched Content Unit is displayed in Grid Style instead of a Slider. You will have to manually create different matched content units for different mobile screen sizes. I would prefer a responsive one though!

    The thumbnails in fixed size can be displayed inside a fix grid or slider depending on the number of related posts AdSense can fetch out of your site.

    Adsense Matched Content in Fixed sized

    Check If Your Blog Is Eligible For Matched Content

    At present Matched content is available only for blogs with multiple pages and high volumes of traffic. You can easily find out if your blog is eligible for Matched content by checking the "My sites" section in your AdSense account.

    Follow these steps to check the eligibility of your blog:

    1. Sign in to your AdSense account.
    2. Click the gear icon and then select Settings.
    3. In the sidebar, select My sites.
    4. Under "My sites", click Matched content.
    5. In the "Sites" section, check to see if your blog is listed:
      • If your blog is listed, you can surely place Matched content units on any of its pages.
      • If your blog isn't listed, then it's not currently eligible for Matched content.

    Do Matched Content Count Towards ad limit per page?

    No!  AdSense has clarified it quite clearly that Ads displayed inside a matched content unit does not count towards your Content Units and Link units per page. You can still publish 3 ad units, 3 link units and 2 search boxed per page.  Matched content units are bonus ads that you can display.

    Create AdSense Matched Content Unit

    Lets first create a matched content unit and later we will discus how to setup and show matched content native ads in blogspot blogs.

    1. Sign in to your AdSense account.
    2. Visit the My ads tab.
    3. Click the button +New ad unit.
    4. Select Native, then click Matched Content. Create AdSense Matched Content Unit
    5. The drop-down in the upper corner of the preview area will tell you which of your blogs are eligible for Matched content. Eligibility of sites for  AdSense Matched Content Unit
    6. From the right sidebar options, give your Matched content unit a suitable name.
    7. Do enable "Monetize with ads" option to earn extra revenue by displaying native ads inside matched content. You will see this option only if you are eligible to monetize your match content unit with ads.  Monetize AdSense Matched Content Unit 
    8. In the "Size" section, choose "Responsive" if your blogger template is mobile responsive else choose custom. When using a custom size, AdSense recommends to choose an ad size with a width:height ratio of around 2:1 for a horizontal layout, or 1:2 for a vertical layout. Create Responsive AdSense Matched Content Unit
    9. Finally click SAVE AND GET CODE.

    Display Matched Content in Your BlogSpot Blog

    You can display several matched content units per page. It is advised to display just two units: one at the bottom of your articles and second on your sidebar. At present I have added just one unit at the bottom of my blog posts. You can use the same code for both the locations.

    Follow these steps to Add Matched Content Unit widget in BlogSpot:

    1. Go To Blogger > Settings> Template
    2. Backup your template first.
    3. Click "Edit HTML"
    4. Search for this code:  <data:post.body/>   Note it will appear several times depending on your layout. Choose the last occurrence of this code.
    5. Paste your Matched Content Code just at the bottom/below of <data:post.body/>. Note if you are using the responsive code then kindly replace async with async='' inside your code to avoid getting errors in your blogger template editor. Edit your code as shown below:
      <script async='' src='//pagead2.googlesyndication.com/pagead/js/adsbygoogle.js'/>
      <!-- Matched Content -->
      <ins class='adsbygoogle' data-ad-client='ca-pub-xxxxxxxxxxxxxxx' data-ad-format='autorelaxed' data-ad-slot='xxxxxxxxxxx' style='display:block'/>
      <script>
      (adsbygoogle = window.adsbygoogle || []).push({});
      </script>
    6. Enclose your final code inside these conditional tags so that matched content is displayed in blog posts only and not the homepage or search pages.
    7. <b:if cond='data:blog.pageType == &quot;item&quot;'>
      AdSense Matched Content Code
      </b:if>
    8. Save your template and you are all done! Visit your blog to see it in action :) 

    Have You Used Matched Content?

    Matched content have surely improved our AdSense earnings and blog pageviews. It is really slow at fetching your blog content but with time once AdSense is able to understand your content well enough, it will display more recommendations and less ads. Do add this new widget by AdSense on your blogs and see the difference for yourselves.

    I have also shared a  tutorial on how to add page-level ads on your blogspot blogs. Which are ads specifically built for your mobile audience.

    How is your experience with AdSense Native ads so far? Do share your valuable views with all of us. :)

    What's The Best Anti-Spam Plugin For WordPress?

    best Anti-spam Plugin for WordpressSpam bots have become so efficient today that ordinary techniques used for spam protection such as security CAPTCHA, arithmetical problems or puzzles are no more useful when it comes to identifying the bad comments. Spam comments badly harm your blog content and ultimately your search ranking. Majority of blogs which are effected by Google penguin penalty are not serious in moderating the amount of spam links which are poor quality external links inserted through the site's comment form. This seriously harms your blog reputation and you suffer in the long run when it comes to ranking in SERPs.
     
    Just recently I had been struggling hard fighting spam on two of our wordpress blogs. I had been been using Akismet Plugin to filter spam comments on my blogs but Akismet badly fails when it comes to identifying the smart spammers. Spammers who post flattery and cheesy comments such as:
    Hi I love your blog content, you have shared some excellent piece of info. Thumbs up!
    Hey wow, great article!
    Very nice!
    and so on
    All these comments add no value to your blog content because they are not the least related to the content shared inside the article and make no sense at all. They surely increase your blog load time because every spam comment means that your browser needs to load an extra image avatar of the spammer, user name, email ID, website link and finally load the comment text. All of this info not only increases the work load on the browser but also effects your keyword density. All those off-topic words seriously distracts the attention of search robots from your primary keywords thus killing the essence of your content.
     
    Limitations of Akismet Plugin
     
    Akismet also does not stop spam registrations, subscriptions or contact emails, it is limited to fighting comment spam only to some extent. We needed a more robust, prompt and multi-purpose  anti-spam plugin for our wordpress sites that could not only provide comment spam protection but would also offer us useful options to stop fake registrations, emails and help us block spammers by IP/Email address, "stop words" or country name. A slight research and consultation from fellow bloggers lead me to a trustworthy anti-spam plugin developed by CleanTalk.
     
    CleanTalk Anti-Spam Plugin for Wordpress

    After installing the anti-spam plugin by CleanTalk, I was able to replace several different plugins such as Akismet and Captcha Plugins with CleanTalk and get much better results without sacrificing the load time. Not only are our over 4600+ comments scanned and moderated automatically on daily basis but it also helps us fight spam bots signups and contact emails. After seeing the significant improvement it has brought to our site SEO and load time, I thought of sharing this handy anti-spam plugin with all of you. The review today will focus on major features based on which we can conclude why CleanTalk Anti-Spam Plugin is the best WordPress Plugin for spam protection against fake comments, signups, contact emails and much more. 

    How CleanTalk Anti-Spam Plugin Works on WordPress?

    To determine the spam bots, CleanTalk uses series of tests, invisible to the visitor your website, and also checks if the message relates to the subject of the article or not. This allows providing 99.998% protection from spam bots, and you will not need to install extra protection.
    1. Suppose a visitor writes a comment or registers on your WP site
    2. CleanTalk plugin sends action parameters into the CleanTalk cloud
    3. Service analyzes the parameters
    4. If this is a visitor, the comment will surely be published. If it�s a spam bot, then CleanTalk blocks this comment or registration. That simple!
    Parameters are then written to the anti-Spam log which can be viewed in the Control Panel service and users are also informed through weekly email newsletter report.
    With such support one can surely turn off protection methods on website that force the user to take certain actions, such as:
    • CAPTCHA, reCAPTCHA,
    • Questions/answers,
    • Arithmetical problems, etc.
    All of these methods are not only easily recognized and bypassed by bots, but also can become irritating for regular visitors.

    CleanTalk prevents and automatically blocks Spam

    CleanTalk is really efficient in recognizing spam. It automatically detects a spam and blocks it before it could harm your blog load time or SEO, thus allowing you to focus on building quality content instead of wasting precious hours in manually deleting the spam comments. The plugin offers multi-support against spam which includes:
    1. Stops spam comments.
    2. Stops spam registrations.
    3. Stops spam contact emails.
    4. Stops spam orders.
    5. Stops spam bookings.
    6. Stops spam subscriptions.
    7. Stops spam in widgets.
    8. Checks the existing comments for spam.
    It's most interesting features include:
    • SpamFireWall: Provides protection against hackers for popular attacks such as XML-RPC brute force, DDoS and more. This option allows to filter spam bots before they access your site. It also reduces CPU usage on hosting server and accelerates pages load time dramatically.
    • Private Black/White lists for IP/email/IP networks - My personal Favorite!
    • Blocking by countries
    • Blocking by "Stop Words".
    It also works just perfectly with the following plugins :
    • WordPress, JetPack comments.
    • WooCommerce review form.
    • WordPress Landing Pages.
    • BuddyPress, bbPress, S2Member, WooCommerce registrations.
    • Contact form 7, JetPack Contact form, Formidable forms and so on
    CleanTalk is also compatible with WordPress cache plugins
    • W3 Total Cache, Quick Cache, WP Fastest Cache, Hyper Cache, WP Super cache, WP-Rocket and any other cache plugins.

    How To Install CleanTalk Anti-Spam Plugin In WordPress?

    Follow these easy steps to install CleanTalk Spam protection service on your wordpress blog:
    1. Download CleanTalk Anti-Spam Plugin from wordpress repository. Spam Protection by CleanTalk (no Captcha Anti-Spam) 
    2. Navigate to Plugins > Add New install cleantalk plugin
    3. Click "Upload Plugin" button towards your top-left. upload plugin
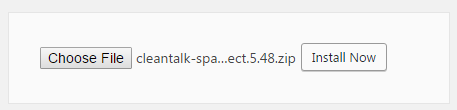
    4. Locate the zip file and hit "Install Now" install plugin
    5. Click "Activate Plugin" activate plugin
    6. On the next page in order to enable anti-spam protection, you will need to enter a free access key. Click "Get access key automatically button"
      enter the access key
      You will also receive emails about your account activation. cleanTalk emails
    7. Enable the "SpamFireWall" Option protection is active
    8. Click Advanced settings links at the bottom and enable the following options:
      • Allow spam comments to be automatically deleted upon detection. CleanTalk Advanced Settings
      • Check "collect details about browsers" option CleanTalk Settings for Wordpress 
      You can enable other options such ass SSL and Woocommerce checkout form if you are using them else leave all options as default.
    9. Click "Save Changes" and you are done with the installation!

    CleanTalk Dashboard and Spam Analytics

    Next Click the link that says "Check comments for spam" from your navbar:
    Check Comments for Spam using CleanTalk
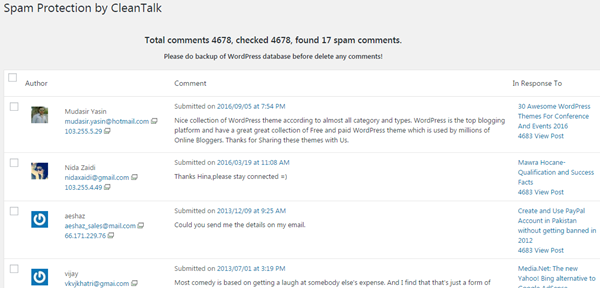
    This is the result I got:
    Spam Comments detected by CleanTalk
    All my 4678 comments were instantly scanned and 17 spam comments were detected and removed. Please note that those 17 comments were ignored by Akismet Plugin which I previously used. This shows how effective and accurate CleanTalk is in detecting and blocking spam.
    You can also check users for spam to see if any of your co-author or contributor may be misusing the site in any way.

    CleanTalk Helps To Block Users By Country/IP/Email

    If you click the "CleanTalk Dashboard" link you will see tons of options to moderate your site comments. An AntiSpam log is updated every 3 minutes to inform you about the spam protection activity going on your site. By the time I am writing this article, several spammers from China and Russia have already started attacking my sites with spam contact emails as shown below:

    Spam contact emails
    AntiSpam log mentions everything about the content being blocked or approved. It will tell you the Author name, email, IP address and also show the content. Clicking the details link will show you the spam content which was posted to my Contact form:

    block spam contact emails in wordpress
    Clicking the IP address will disclose full identity of the spammer. You can choose to blacklist the spammer by email ID, IP address or even by country name.
    IP address of spammer
    IP address of spammer
    blacklist spammer
    The Blacklist option is my personal favorite and helps me block a bulk of spammers at once using the country option. Since my content is in English, people from China and Russia are surely not my intended audience so blocking these countries could surely save me bandwidth and decrease load on servers.
    The "Trends" page shows you interesting info using graphical illustration about the total number of blocked and approved/legitimate comments


    CleanTalk Trends Report
    On the "Spam and legitimate hits" drop down box you can see who were the Top20 spammers on your site for the last week.


    Check Top spammers on your site using CleanTalk

    Top spammers on wordpress site

    Tons of more such features that you can discover for yourselves that not only helps you better moderate your blog but significantly improve its load time and SEO in long run.

    How To Signup for CleanTalk Spam Protection?

    CleanTalk offers a free trial for 7 days only after which it will start charging $8/year which isn't that much as compared to the quality service it provides for an entire year. I am also greatly impressed by their instant 24/7 free help and customer support. Since I have two sites, I am looking forward to upgrade my plan. Currently $8/year plan best suits our requirements.
    Paying for a year of anti-spam service, you save a lot more and receive:
    • Up to 99.998% protection from spam bots.
    • Time and resources saving.
    • More registrations/comments/visitors.
    • Protection of the several websites at once in different CMS.
    • Ease in installation and using.
    • Traffic increase and loyalty to the users.
    • 24/7 technical support.
    • Clear statistics.
    • No captcha (reCaptcha), puzzles, etc.
    • Free mobile app to control anti-spam function on your website.
    Additional features
    • Daily and weekly detailed anti-spam reports: traffic VS spam.
    • Apps for iPhone, Android to control anti-spam service, comments, signups, contacts, traffic and spam statistics for the last 7 days.
    • AntiSpam apps for most popular CMS on cleantalk.org.

    How Do You Protect Your Sites From Spam?

    I am sure spam is a headache for us all. I have shared my experience of Akismet and CleanTalk. Please share your precious views on both of them and have you tried CleanTalk yet?
     
    Can you image how much spam I used to receive through my Wordpress site's contact form alone? See the Gmail screenshot below and imagine how at piece would I be today? =)

    Spam in gmail

    CleanTalk Anti-Spam Plugin Review
    Published
    Summary CleanTalk Anti-Spam Plugin is the best WordPress Plugin for spam protection against fake comments, signups, contact emails and much more.
    Reviewer
    Publisher My Blogger Tricks
    Ratings 5/5