10 Killer SEO Tips To Make Your "Wix Website" SEO friendly

We have discussed a lot about BlogSpot and WordPress blogging platforms for the past 8 years but never did we expect that these two platforms could have a third rising competitor called "Wix" that is dramatically becoming a leading cloud-based website development platform to over 90 million users worldwide. It is currently the most popular drag and drop website building platform with HTML5 capabilities offering 15 different template categories. Whether you wish to create a free mobile responsive blog, online store or business site, it honestly makes every technical detail look like a piece of cake. 10 Tips to Make Wix Websites SEO Friendly

Back in 2008 when I started my online career, I would often see people creating professional websites using Wix within seconds without having any technical skills or knowledge about coding or web designing. Over the past few weeks a lot of our blog readers have started taking interest in Wix's free website builder to create personalized, high-quality free websites. They have been asking us several questions regarding whether Wix websites are SEO friendly or not. To inspect this, I took a detailed overview of Wix�s SEO tools, its platform and features. I have completed an in-depth SEO audit report which I would like to share with you all.

No content management platform be it WordPress, Blogger or Wix, can help you to attract thousands of visitors to your website unless you know how to optimize the platform and make it search friendly. Wix does surely provide its users with all tools required to make a website rank higher in SERPs, all that is needed is making the best possible use of these tools by following correct SEO settings. Today we will be discussing 10 killer SEO tips to help you take your Wix website to the next level. But before that lets discuss some basics first!

How to Create a Wix Website?

1 Sign up for free Wix account

wix template categories

2 Wix will give you two options: Either to customize your site using Wix ADI or Wix Editor. If you are a fan of Artificial Design Intelligence then you should go with Wix ADI but if you want to manually personalize your site using advanced features then go with Wix Editor.

Wix ADI editor

3 Choose a template out of 500+ professional free layouts

Over 500 Professional Wix Templates

4 Hover over a template and click the edit button
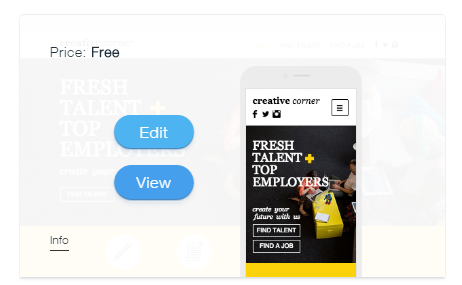
Wix Template Selection

5 Start customizing your site by add anything like text, background images & more using Wix website builder. Editing your site is simply fun. Just drag and drop the elements to give your site a perfect look based on your preferences.

Wix Website Builder Interface

6 Finally click the publish button and you will be asked to name your site domain.

Publish your Wix Website

You can either go with a free domain or you can choose to buy a custom domain to give your site a more professional look. Website domain charges at Wix are extremely cheap. You can either connect an existing domain you might have bought from an external domain registrar or you can choose to buy a new domain from Wix itself at a fairly reasonable cost.
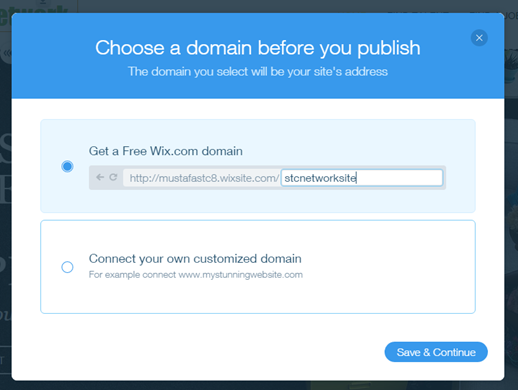
Get a Custom Domain for your Wix Website

Finally you are ready to showcase your site to the world!

Are Wix Websites SEO Friendly?

When Wix was first launched in 2006 it served Flash based web pages which were though user friendly and crawl-able by search engines but Wix Flash sites were more limited in the options they provided users to engage in the process of SEO. But Since 2012, with the launch of their HTML5 Editor, a massive improvement was done which completely changed the wrong myths related to Wix SEO.

Wix has now made site SEO a major priority. There have been many updates made in this regard, in order to fully conform to the guidelines set forth by the search engines. Some of the updates include, the provision of user friendly URLs, improvements in loading time of sites, elimination of the canonical tag to the homepage, and automatically produced mobile-optimized versions of all Wix websites.

Based on these latest improvements, Wix has surely changed the views of webmasters and SEOs around the world. I have therefore decided to write several tutorials to help people make their online presence even more worthwhile using Wix.

Lets begin with our 10 Killer SEO tips that will make any Wix Website search friendly.

1. Verify Your Wix Website With Google, Bing & Yandex

First and foremost step is to let all search engines know about your site so that they could crawl and index your site. At present the leading search engine is Google but submitting your site to Bing/Yahoo and the Russian search engine Yandex will give you extra flow of organic traffic. More traffic means more sales and more business!

Each search engine gives you a meta tag for verification that you will need to add to your Wix site.I will be discussing the method for Google Webmasters only and exact same procedure is applied for Bing and Yandex Webmasters account. 

To verify your Wix website With Google Webmasters tool follow these steps:

  1. Go to Google Search Console, signup if you have not already and then submit your site URL.

  2. select the HTML tag method under the "Alternate methods" tab. Copy the HTML meta tag code and keep it save for later use.Google Search Console Meta Tag Verification

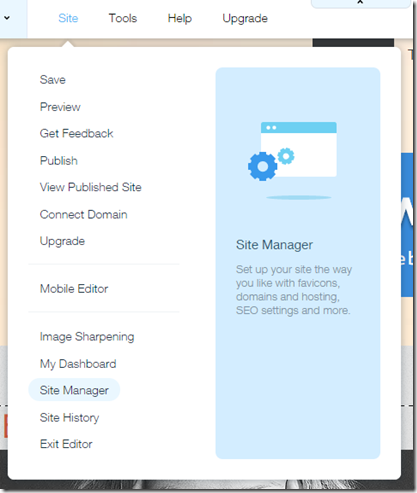
  3. Proceed to Wix Editor and then choose Site Manager option under Site tab. Wix Site Manager

  4. Click the SEO tab.

  5. Scroll down to More SEO Settings.

  6. Paste the Google Meta Tag code in the text box under Header Code - Meta Tags. Wix Header Code - Meta Tags 

  7. Now go back to Google Search Console page and click Verify. Thus you have successfully verified your Wix website with Google!

Exact same method apply to Bing and Yandex search engine.

2. Submit Wix Sitemap To Google, Bing & Yandex

After you have verified your site with Google/Bing/Yandex, you can now submit your Wix Sitemap to these search engines so that your site is automatically indexed and crawled each time you update it.

Wix creates a search friendly sitemap.xml file for your websites that will help search engines keep track of your site content on a regular basis.

To submit your Wix sitemap:
  1. Select your site on your Google Search Console home page.

  2. Click Crawl.

  3. Click Sitemaps. Submit Wix Sitemap to Google

  4. Click ADD/TEST SITEMAP.

  5. Type sitemap.xml. Submit Wix Sitemap to Google

  6. Click Submit and you are all done!

Your sitemap is located at your root domain directory i.e.

http://Your-Wix-Site.com/sitemap.xml

You will need to submit this sitemap to Bing and Yandex in almost similar same way. That simple!

3. Block a Page Without Editing Wix's Robots.txt File

Wix automatically generates a robots.txt file for every Wix site. You can view this file by adding '/robots.txt' to your root domain i.e.

http://Your-Wix-Site.com/robots.txt

Wix does not allow its users to edit robots.txt file because Wix SEO team takes care of your robots.txt file themselves and they make sure that pages which are not important to you may not appear in search results. Wix has added files related to the structure of Wix sites to the robots.txt file, including noflashhtml and backhtml links. As these links do not contribute to your site's value in terms of SEO, they do not need to be crawled.

You can block pages from appearing in search results either using robots.txt file or by using the noindex meta tag. If in case you wish to hide a certain page of your Wix website from search engines then you can do this by following this work around:

  1. Click the Pages Menu from the top bar of the Editor.

  2. Click the relevant page.

  3. Click the Show More icon .

  4. Click Page SEO. Wix Page SEO

  5. Click the toggle next to Hide this page from search results to enable the option. Noindex a Page in Wix

  6. Click Done. Wix will automatically add a noindex tag to the header of that page.

Thus you have successfully blocked a page of your site from appearing in search results without having to edit your robots.txt file

4. Add Google Analytics Code To You Wix Website

Google Analytics allows you to track information about your site including:

  • Total number of visitors to your site

  • Visitor's geographical location

  • Length of stay

  • Find in real time which pages your visitors are reading

  • Much more!

To use Google Analytics, start by upgrading your Wix site with a Premium Plan so you'll be able to connect a custom domain. To connect your analytics account with your Wix custom domain, follow these easy steps:

  1. Click here to sign in to your Wix account.

  2. Hover over the user panel at the top right and click Domains.

  3. Click the expand arrow next to the domain connected to the site you want to track.

  4. Click the Analytics tab.

  5. Paste your Google Analytics code into the Google Analytics Code field. Make sure that there are no extra spaces before the code!

  6. Click Submit.

5. 301 Redirect Your Old site To Your New Wix Website

This one is an advanced option and requires you to clearly understand what exactly are 301 redirects. The basic purpose of a 301 redirect is to retain the SEO ranking of your existing site links when creating a new site with Wix. It also helps you to redirect your old/deleted page links to the corresponding pages on your new Wix site.

You can redirect your old site to the new Wix site by doing a simple 301 redirect of each page to the newly created Wix pages.

  1. From inside Wix Editor, go to Site > Site manager

  2. Click SEO tab

  3. Scroll down to "Manage 301 Redirects"

  4. Inside the source link, type your old Page link and from the "Page" field select the corresponding page you created on Wix.

  5. Hit the Publish button when you are all done!
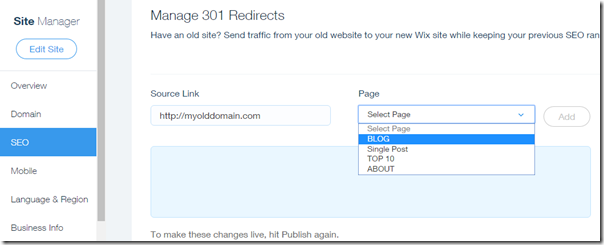
Doing 301 redirects in Wix

Using this tool you can also redirect deleted Wix pages to the new pages. By default 404 pages in Wix are auto redirected to the homepage. Incase you have deleted a Wix page but it is still appearing in search results then you can redirect that deleted page to a new page using the 301 Redirect tool.

6. Optimize Meta Title Tags in Wix

Your page title tag is used as the headline of each page. Your Title tag is not visible to your visitors on your webpage but it appears in the source code of the page, where it is visible to search engines. Meta Title Tag preview in Google

Your page title is also used:

  • When Someone bookmarks your page

  • When your page is shared on Facebook/Google+/Twitter and other social media networks

  • In the browser tab

Make sure your title contains your primary keyword and make sure your title does not exceed the 60 characters optimal length for search engines. Make sure your title is easy to read and attractive - a relevant and descriptive title is more likely to 'convince' users to click it in search results.

TIP: You can use our character counter tool

Google displays the first 50-60 characters of a title tag. If you keep your page titles under 55 characters, you can expect at least 97% of your titles to display properly in search results. A title longer than 60 characters is trimmed by Google in SERPS.

To change the title tag of a page, follow these steps:

  1. Click the Pages Menu from the top bar of the Editor.

    Wix pages menu

  2. Click the relevant page.

  3. Click the Show More icon .

  4. Click Page SEO.

  5. Enter the page title under What's the page's title on search engines?.

  6. Click Done.

  7. Click Publish at the top right of the Editor.

Wix Title Tag Field

7. Optimize Meta Description Tags in Wix

Meta description tag is the soul of your entire content. It gives a simple, precise and summary of your entire article. A robot finds it extremely helpful when you provide a short 145 Characters summary of your blog posts. It is the second biggest ranking factor after the title. When you don't manually choose a description for your blog posts, you give your competitors a bigger chance to rank higher than you.

Just like your title tag, description tag is not visible on your site's page, but appears below your title in search results.

Meta Description preview in Google

Note these three points to write SEO friendly Page descriptions:

  1. Description should not be less than 50 characters or exceed 145 characters (Google trims the description after 160 characters), spaces included.

  2. Your description must include your primary keyword or phrase.

  3. Make sure to create a compelling and eye catching description in order to entice users to click.

To change Wix page description follow these steps:

  1. Click the Pages Menu ?? from the top bar of the Editor.

    Pages menu in Wix?

  2. Click the relevant page.

  3. Click the Show More icon ??.

  4. Click the Page SEO.

  5. Enter the page description under What's the page about?.

  6. Click Done.

Edit Page Description in Wix website builder

8. Optimize Permalinks Of Your Wix Website

Most people do not realize that permalink is the third most important place after title and description, where they can insert their focus keyword for maximum search exposure.

An optimized permalink or SEO friendly URL is a combination of targeted keywords that explains the content of your webpage. It should be precise and to the point. Long, lengthy links get chopped in search results and you loose the opportunity of ranking high in SERPs.

  1. Depending on your URL structure keep it limited to 40 Characters


  2. Must insert your primary Keyword in permalink


  3. Keep it short and to the point


permalink preview in google search

For optimizing permalinks of a Wix website follow these steps:

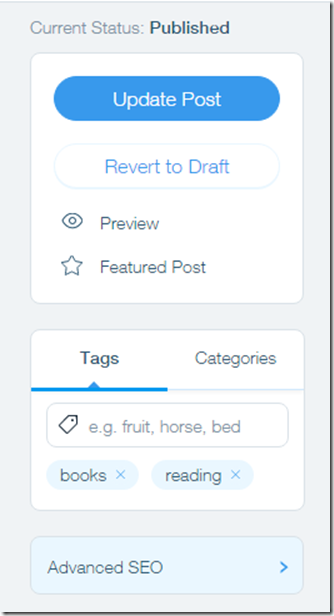
  1. While editing a blog post in Wix editor, click the "Advanced SEO" buttonWix Advanced SEO

  2. Under the "URL Permalink" section, insert your keywords keeping in mind best SEO practices that we discussed Editing Permalinks in Wix

  3. For editing the permalink of a static page click "Site Manager" inside the Wix Editor and then choose "Page SEO" tabCreating SEO Friendly URL in Wix

That's how you can optimize the permalink slug for Wix Pages and blog posts.

9. Effective Use Of H1, H2 and H3 Heading Tags

Heading tags play a vital role in better explaining your site content to search robots by highlighting areas which represent the soul and heart of your website content. Just like how important are newspaper headlines for its users, same is the case with page heading tags which are not only important with regard to readability but also when it comes to ranking high in search results.

Heading tags are an important part of your site's SEO and are highly regarded by search engines. Search engines give a lot of important to heading tags in the following order of descending importance.

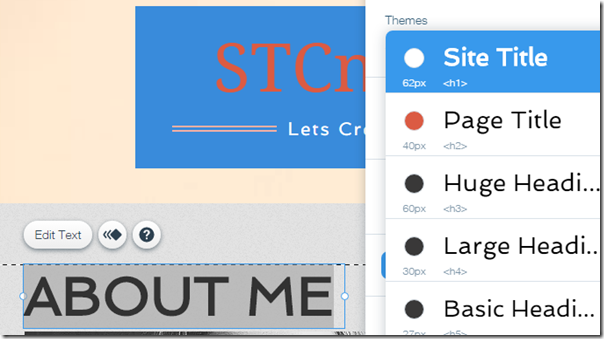
  • H1 - Used In Site Title

  • H2 - Used In Page Title

  • H3 - Used in Sub Headings Inside Content

  • H4

  • H5

  • H6

Heading Tag Tips For Wix Sites:

For Homepage

  • Each page should have its own unique set of heading tags.

  • A page should have one H1 tag only, as the H1 tag acts as the page headline.

  • Make Sure H1 Tag is assigned only to main website Title on Homepage. i.e. LOGO Text.

  • Assign H2 Tags for Headlines on Homepage and H3 for Sub Headlines

For Pages and Posts

  • On Static Pages or Blog Posts, assign H1 To Page Title Only. Set the LOGO text as normal paragraph.

  • One Pages or Posts, assign H2 to Headlines and H3 to Sub Headlines

Optimize Heading Tags:

  1. Click Add ?? on the left side of the Editor.

  2. Click Text.

  3. Click Site Title. SEO Friendly Heading Tags in Wix

  4. Click the text element.

  5. Click Edit Text.

  6. Edit the text.

10. Optimize Images Using "Alt" Text In Wix

Yes robots are blind to media! They can not read your images unless you add a "alt" attribute (alternative text) to your images.

If you are not tagging your site images, you are loosing the opportunity to gain organic traffic from Image search and indirectly give an edge to your competitors. Robots can not understand what your image is all about without the alt attribute. Wix helps you to easily add the alt text to your images through the Image tool.

To add Alt Text to an image in Wix follow these steps:

  1. Click the image.

  2. Click the Settings icon ??.

  3. Enter a description of the image under What's in the image? Tell Google.

Optimizing Images in Wix Website Builder

Follow these tips to ensure you optimize the images well:

  1. The Alt text should be short and descriptive;

  2. Do not exceed an alt text longer than 70 characters.

  3. Make sure to insert your primary keyword here if needed

Tell Us Any New Wix SEO Tip!

I just hope we have covered almost every basic and advanced Wix SEO tip to ensure you make the most out of your Wix websites. Wix has surely changed the way people used to design websites. Website building which was once costly and required complex technical skills is now a simple game of drag and drop thanks to free website building platforms like Wix.

If you are a Wix user or if you just started using Wix, let us know any unique SEO tip that we might have missed discussing. I would love to hear your precious views on how you use Wix to optimize your site and how has Wix helped you in making your online presence more productive. Let me know if you have any queries related to Wix SEO, I would love to answer them as soon as time allows. 

Create Random Post Slider Widget For BlogSpot Blogs!

Create Random Post Slider For Blogspot blogsEver wondered you could display images randomly inside a blogger slider? So far we have shared dynamic recent posts slider and a static slider, today for the first time online, we are releasing a Random Post Slider for BlogSpot blogs which is built using Blogger JSON Feeds API, FlexSlider and jQuery. A fully responsive image slider that will automatically display your random posts on your homepage or sidebar, almost anywhere you want.  Lets learn how to create a random slider for blogspot in simple steps but before that lets see a live demo!

What is Blogger Random Post Slider Widget?

Due to the natural structure of blogging platforms such as blogspot, articles end up being buried down once they get old. New users often avoid navigating through all your labels/categories, as a result most of your best content receives no attention at all. A random post slider is the best way to showcase your oldest posts to your visitors. The slider widget will pick your old posts randomly and automatically display the thumbnails either on homepage or sidebar depending on what location best suits you. The slider rotates in a clockwise direction where each slide is both responsive and dynamic.

Features of Blogger Random Post Slider Widget

Each slide will display useful data which is fetched using a JSON Call. Features supported include:

  • Article comments count,
  • Author avatar,
  • Author name,
  • Published date,
  • Labels,
  • Featured Thumbnail,
  • Third Party Thumbnail Support,
  • YouTube Thumbnail Support,
  • Editable Title,
  • Mobile responsive (Smartphones/ Tablets/ Laptops/ Desktop Screens supported)

Create and Random Post Slider in Blogger

Follow these easy steps:

  1. Go To Blogger > Template
  2. Backup your template
  3. Click "Edit HTML"
  4. Just below <head> tag paste the following JS and CSS source links:

    <script src='http://ajax.googleapis.com/ajax/libs/jquery/1/jquery.min.js' type='text/javascript'></script>
    <link href='http://fortawesome.github.io/Font-Awesome/assets/font-awesome/css/font-awesome.css' rel='stylesheet'/>
    <link href='http://fonts.googleapis.com/css?family=Oswald' rel='stylesheet' type='text/css'/>
    <link href='https://cdnjs.cloudflare.com/ajax/libs/flexslider/2.6.1/flexslider.min.css' rel='stylesheet' type='text/css'/>
    <script src='https://cdnjs.cloudflare.com/ajax/libs/flexslider/2.6.1/jquery.flexslider.min.js' type='text/javascript'></script>

    Note: Do not add JQuery, FontAwesome, FlexSlider or Oswald source links to your template if you are already using them on your site.

  5. Next search ]]></b:skin> and just above/before it paste the following code:

    /*######### Random Posts By MyBloggerTricks #############*/
    .mbt-random{margin:0 5px;border:0;width:100%;overflow:hidden}
    .mbt-random .slides{list-style-type:none;margin:0 auto;padding:0}
    .mbt-random li{color:#fff;font-family:helvetica;font-size:12px;overflow:hidden;padding-top:10px}
    .mbt-random .flex-control-nav li{display:inline-block;margin:0 2px}
    .mbt-random .flex-control-nav a{text-indent:9999px;display:block;width:10px;cursor:pointer;height:10px;background-color:#000;border:1px solid #000;border-radius:0!important}
    .flex-direction-nav .flex-prev{left:-50px}
    .flex-direction-nav .flex-next{right:-50px;text-align:right}
    .mbt-random .flex-control-paging{display:none}
    .flex-direction-nav{position:relative;top:-250px}
    .mbt-random .flex-control-nav a.flex-active{background-color:#84db06;border:1px solid #90f128}
    .mbt-random .flex-div{margin:0 auto;display:block;padding:0!important;position:relative;height:370px}
    .mbt-random li a{color:#0080ff;text-decoration:none}
    .mbt-random i{color:#999;padding-right:5px}
    .mbt-random .iline{line-height:2em;margin:0;position:relative;top:-90px;background:#56adff;padding:3px 10px;display:inline-block}
    .mbt-random .icontent{line-height:1.5em;margin-top:5px}
    .mbt-random div span{margin:0 5px 0 0;display:inline-block;font-weight:400}
    .mbt-random .mbttitle{font-family:oswald;font-size:20px;color:#fff;font-weight:400;text-decoration:none;position:relative;top:-90px;background:#66b5ff;padding:15px 10px;display:block}
    .mbt-random .mbttitle:hover,.mbt-random .itotal a:hover{color:#fff;text-decoration:none}
    .mbt-random .iedit a{text-decoration:none;color:#999;cursor:pointer}
    .mbt-random .iedit:before,.mbt-random .iauthor:before,.mbt-random .itag:before,.mbt-random .icomments:before,.mbt-random .idate:before,.mbt-random .itotal span:before{font-family:fontAwesome;position:relative;padding-right:8px;color:#fff}
    .mbt-random .iauthorpic{width:17px!important;height:17px!important;border-radius:50%;float:none;display:inline-block!important;margin:0;padding-right:3px;position:relative;top:3px}
    .mbt-random .iFeatured{overflow:hidden;position:relative;margin:0;padding:0;width:100%}
    .mbt-random .iFeatured a{background:none;padding:0;display:block;border:0px solid #eee;margin:0 -1px}
    .mbt-random .iFeatured img{height:305px!important;-moz-transition:all .3s;-webkit-transition:all .3s;transition:all .3s;border-radius:0;margin:0;padding:0;opacity:.7}
    .mbt-random .iFeatured:hover img{opacity:1;-moz-transform:scale(1.4);-webkit-transform:scale(1.4);transform:scale(1.4)}
    .mbt-random .icomments a, .mbt-random .itag a{color:#0080ce;font-family:arial;font-size:12px}
    .mbt-random .icomments a:hover, .mbt-random .itag a:hover{text-decoration:underline}
    .mbt-random .itag:before{content:'\f02c';padding:0 3px 0 7px;color:#fff}
    .mbt-random .icomments:before{content:'\f086';padding:0 3px 0 7px;color:#fff}
    .mbt-random .idate{color:#fff;padding:3px 4px;font-family:arial;font-size:11px}
    .mbt-random .idate:before{content:'\f073';padding:0 5px;color:#fff}

  6. Make these changes

    • To change the blue background color behind the title edit: #66b5ff
    • To change the light blue background behind Author name edit: #56adff
    • To change the white color of the Title text edit: #fff
    • To change the color of the comment and labels link edit: #0080ce
  7. Save your template.
  8. Now go to Blogger > Layout
  9. Select "Add a Gadget"
  10. Choose "HTML/JavaScript" gadget
  11. Keep the title field empty and then paste the following code inside it:

    <script type="text/javascript">
    //################### Defaults
    var ListBlogLink = "http://mybloggertricks.com";
    var ListCount = 4; 
    var TitleCount = 66;
    var ImageSize = 800;

    $(window).load(function() {
      $('.mbt-random').flexslider({
       animation: "slide",
        itemWidth: 600,
    itemMargin: 25,
      directionNav: true,
           touch: true,
           slideshowSpeed: 2500,
          pauseOnHover: true,
         animationSpeed: 700,
      });
    });

    var RandomArray = [];
    var TotalPosts  = 0;
    var RandomArray = new Array(ListCount);
    function TotalCount(json) {
        TotalPosts   = json.feed.openSearch$totalResults.$t
    }
    document.write('<script type=\"text/javascript\" src=\"'+ListBlogLink+'/feeds/posts/default?alt=json-in-script&callback=TotalCount\"><\/script>');

    function GenerateNum() {
        for (var i = 0; i < ListCount ; i++) {
        for (var j = 0; j < RandomArray.length; j++){
        var RandomNum = Math.floor(Math.random() * (TotalPosts ) + 1);
        RandomArray[i] = RandomNum; }
                                                                      }
    }

    </script>

    <div class="flexslider mbt-random">
    <ul class="slides">
    <script type="text/javascript">
    //################### Function Start
    function mbtrand(json) {
    for (var i = 0; i < json.feed.entry.length; i++)
    { 
    //################### Variables Declared
    var listing= ListImage = ListUrl = ListTitle = ListImage = ListContent = ListConten = ListAuthor = ListTag = ListDate = ListUpdate = ListComments = thumbUrl = TotalPosts = sk = AuthorPic= ListMonth = Y = D = M = m = YY = DD = MM = mm = TT =  "";
    //################### Category

    if (json.feed.entry[i].category != null)
    {
    for (var k = 0; k < json.feed.entry[i].category.length; k++) {
    ListTag += "<a href='"+ListBlogLink+"/search/label/"+json.feed.entry[i].category[k].term+"'>"+json.feed.entry[i].category[k].term+"</a>";
    if(k < json.feed.entry[i].category.length-1)
    { ListTag += ", ";}
    }
    }
    //################### URL
    for (var j = 0; j < json.feed.entry[i].link.length; j++) {
          if (json.feed.entry[i].link[j].rel == 'alternate') {
            break;
          }
        }
    ListUrl= "'" + json.feed.entry[i].link[j].href + "'";
    //################### Info
    TotalPosts = json.feed.openSearch$totalResults.$t;
    if (json.feed.entry[i].title!= null)
    {
    ListTitle= json.feed.entry[i].title.$t.substr(0, TitleCount);
    }
    if (json.feed.entry[i].thr$total)
    {
    ListComments= "<a href='"+json.feed.entry[i].link[j].href+"#comment-form'>"+json.feed.entry[i].thr$total.$t+"</a>";
    }
    ListAuthor= json.feed.entry[i].author[0].name.$t.split(" ");
    ListAuthor=ListAuthor.slice(0, 1).join(" ");
    AuthorPic = json.feed.entry[i].author[0].gd$image.src;
    //################### Date Format
    ListMonth= ["Jan", "Feb", "Mar", "Apr", "May", "Jun", "Jul", "Aug", "Sep", "Oct", "Nov", "Dec"];
    ListDate= json.feed.entry[i].published.$t.substring(0,10);
                             Y = ListDate.substring(0, 4);
                            m = ListDate.substring(5, 7);
                             D = ListDate.substring(8, 10);
                             M = ListMonth[parseInt(m - 1)];                      
    ListUpdate= json.feed.entry[i].updated.$t.substring(0, 16);
                             YY = ListUpdate.substring(0, 4);
                            mm = ListUpdate.substring(5, 7);
                             DD = ListUpdate.substring(8, 10);
                             TT = ListUpdate.substring(11, 16);
                             MM = ListMonth[parseInt(mm - 1)];  
    //################### Thumbnail Check

    if (json.feed.entry[i].media$thumbnail)
    {
    thumbUrl = json.feed.entry[i].media$thumbnail.url;
    sk= thumbUrl.replace("/s72-c/","/s"+ImageSize+"/");
    ListImage= "'" + sk.replace("?imgmax=800","") + "'";
    }

    // YouTube scan
    else if (json.feed.entry[i].content.$t.match(/youtube\.com.*(\?v=|\/embed\/)(.{11})/) != null)
    {
        var youtube_id = json.feed.entry[i].content.$t.match(/youtube\.com.*(\?v=|\/embed\/)(.{11})/).pop();
       
        if (youtube_id.length == 11) {
            var ListImage = "'//img.youtube.com/vi/"+youtube_id+"/0.jpg'";
            }
    }

    else if (json.feed.entry[i].content.$t.match(/src=(.+?[\.jpg|\.gif|\.png]")/) != null)
    {
    // Support For 3rd Party Images
    ListImage =  json.feed.entry[i].content.$t.match(/src=(.+?[\.jpg|\.gif|\.png]")/)[1];
    }
    else
    {
    ListImage= "'https://blogger.googleusercontent.com/img/b/R29vZ2xl/AVvXsEgtm0maNUr06C_jCvhDoLUkVnptgdxcrDZZu6uXi9IGh6IreJpMcY7Vcs4HP-ynBx46v8dBcA6Lk4Jhoy0TGbObxeJt3O6fnk1iWw1OAgEOBPQZQBEosJkkxc6iVuTMKCMa70UGC7-K9Do/s200/Icon.png'";
    }
    //###################  Printing List
    var listing = "<li><div class='flex-div'><div class='iFeatured'><a  href="
    + ListUrl+
      "><img src="
    +ListImage+
    "/></a></div><div class='iline'><span class='iauthor'><img class='iauthorpic' src='"+AuthorPic+"'/>"
    +ListAuthor+
    "</span><span class='icomments'>"
    +ListComments +
    "</span> <span class='idate'>"
    + D +
    " "
    + M +
    "</span><span class='itag'>"
    +ListTag +
    "</span></div><a class='mbttitle' href="
    +ListUrl+
    "target='_blank'>"
    +ListTitle+
    "</a></div></li>";

    document.write(listing);

    } }
    <!-- #### Invoking the Callback Function #### -->
    for (var i = 0; i < ListCount ; i++) {
    GenerateNum();
    var scripta = '<script type=\"text/javascript\" src=\"'+ListBlogLink+'/feeds/posts/default?alt=json-in-script&start-index='+RandomArray[i] + '&max-results=1&callback=mbtrand\"><\/script>';
    document.write(scripta);
    };

    </script>
    </ul></div>

    Make these changes to customize the slider:

    • Place your blog URL inside ListBlogLink
    • Inside ListCount  mention how many slides to display. I recommend not displaying more than 3 or 4 slides. Increasing this number will increase the number of iterations/loops and thus slowing down your site.
    • Inside TitleCount  mention the length of title characters to display. By default titles longer than 66 characters will be trimmed.
    • Inside ImageSize mention the aspect ratio or resolution of your featured thumbnails. By default the thumbnails will be 800px in width. If you wish to display the slider in sidebar only then you can decrease this value to 400px.
  12. Click Save and you are all done!

You have now successfully created blogger random post slider and have installed it on your blog template. Visit your blog to see it working just fine. If in case you troubleshoot yourself, feel free to leave your comments below and I would love to help you with all your queries.

I have installed a random post widget on my blog slider and so far it has really helped growing our audience. I wish this slider may help you equally. This is the first random slider widget of its kind published online for blogger blogs therefore do let us know how useful is this slider for you and what is your experience after installing it successfully on your template. Peace buddies! :)

If you are interested to learn how are blogger widgets developed and coded then do read:

Blogger Image Slider - Display Featured Posts in BlogSpot!

Blogger Image Slider - Static and ResponsiveWe have so far discussed different types of dynamic sliders and carousels for blogspot blogs but since some of you requested a static image slider where you could display featured posts based on your selection, so I thought of sharing a jQuery Static Image Slider where you can add custom info to feature your favorite blog posts on your homepage. If in case you want to display images automatically based on a specific label please check: Dynamic Blogger Slider.

Lets See a Demo first:

What is a Blogger Image Slider?

Blogger Image sliders (also known as image carousels or slideshows) is the best way to display multiple images, videos, or graphics on your website. Featured images that users can slide or swipe can draw new visitors into your site, capturing their attention immediately thus bringing you more pageviews and revenue.

Blogger Image sliders can be static or dynamic.

  1. STATIC IMAGE SLIDER: In a static slider that we are discussing today, you can manually add images based on your selection. Example: 4+ jQuery Image Sliders, Image Slideshow, the slider being discussed today.
  2. DYNAMIC IMAGE SLIDER: In a dynamic slider such as Blogger carousel or Recent posts slider that we released earlier, images are automatically displayed by pulling the latest posts from a specific blog label mentioned by you. Example: Dynamic Image Slider, Blogger Carousel

Responsive By Default

Blogger Image Slider is built using FlexSlider and it is by default Mobile responsive and fluid. It adapts automatically to different device screen sizes. See the screenshots below

[ SMARTPHONES ]

responsive slider for Smartphone

[ TABLETS / IPADS]

responsive slider for tablets

[ DESKTOP / LAPTOPS ]

responsive image slider for blogger

Add Blogger Image Slider To Your Blog

Follow the easy steps below to add this cool responsive blogger image slider to your templates.

  1. Go To Blogger > Template
  2. Backup your template
  3. Click "Edit HTML"
  4. Just below <head> tag paste the following JS and CSS source links:

    <script src='http://ajax.googleapis.com/ajax/libs/jquery/1/jquery.min.js' type='text/javascript'></script>
    <link href='http://fortawesome.github.io/Font-Awesome/assets/font-awesome/css/font-awesome.css' rel='stylesheet'/>
    <link href='http://fonts.googleapis.com/css?family=Oswald' rel='stylesheet' type='text/css'/>
    <link href='https://cdnjs.cloudflare.com/ajax/libs/flexslider/2.6.1/flexslider.min.css' rel='stylesheet' type='text/css'/>
    <script src='https://cdnjs.cloudflare.com/ajax/libs/flexslider/2.6.1/jquery.flexslider.min.js' type='text/javascript'></script>

    Note: Do not add JQuery, FontAwesome, FlexSlider or Oswald source links to your template if you are already using them on your site.

  5. Next search ]]></b:skin> and just above/before it paste the following code:

    /*######### Blogger Image Slider By MyBloggerTricks #############*/
    .mbt-s{margin:0 5px;border:0;width:100%;overflow:hidden}
    .mbt-s .slides{list-style-type:none;margin:0 auto;padding:0}
    .mbt-s li{color:#fff;font-family:helvetica;font-size:12px;overflow:hidden;padding-top:10px}
    .mbt-s .flex-control-nav li{display:inline-block;margin:0 2px}
    .mbt-s .flex-control-nav a{text-indent:9999px;display:block;width:10px;cursor:pointer;height:10px;background-color:#000;border:1px solid #000;border-radius:0!important}
    .flex-direction-nav .flex-prev{left:-50px}
    .flex-direction-nav .flex-next{right:-50px;text-align:right}
    .mbt-s .flex-control-paging{display:none}
    .flex-direction-nav{position:relative;top:-250px}
    .mbt-s .flex-control-nav a.flex-active{background-color:#84db06;border:1px solid #90f128}
    .mbt-s .flex-div{margin:0 auto;display:block;padding:0!important;position:relative;height:370px}
    .mbt-s li a{color:#0080ff;text-decoration:none}
    .mbt-s i{color:#999;padding-right:5px}
    .mbt-s .iline{line-height:2em;margin:0;position:relative;top:-87px;background:#31363a;padding:3px 10px;display:inline-block}
    .mbt-s .icontent{line-height:1.5em;margin-top:5px}
    .mbt-s div span{margin:0 5px 0 0;display:inline-block;font-weight:400}
    .mbt-s .mbttitle{font-family:oswald;font-size:20px;color:#ff0;font-weight:400;text-decoration:none;position:relative;top:-90px;background:#222;padding:15px 10px;display:block}
    .mbt-s .mbttitle:hover,.mbt-s .itotal a:hover{color:#fff;text-decoration:none}
    .mbt-s .iedit a{text-decoration:none;color:#999;cursor:pointer}
    .mbt-s .iedit:before,.mbt-s .iauthor:before,.mbt-s .itag:before,.mbt-s .icomments:before,.mbt-s .idate:before,.mbt-s .itotal span:before{font-family:fontAwesome;position:relative;padding-right:8px;color:#fff}
    .mbt-s .iauthorpic{width:17px!important;height:17px!important;border-radius:50%;float:none;display:inline-block!important;margin:0;padding-right:3px;position:relative;top:3px}
    .mbt-s .iFeatured{overflow:hidden;position:relative;margin:0;padding:0;width:100%}
    .mbt-s .iFeatured a{background:none;padding:0;display:block;border:0px solid #eee;margin:0 -1px}
    .mbt-s .iFeatured img{height:305px!important;-moz-transition:all .3s;-webkit-transition:all .3s;transition:all .3s;border-radius:0;margin:0;padding:0;opacity:.7}
    .mbt-s .iFeatured:hover img{opacity:1;-moz-transform:scale(1.4);-webkit-transform:scale(1.4);transform:scale(1.4)}
    .mbt-s .icomments a{color:#0080ff;font-family:arial;font-size:12px}
    .mbt-s .icomments a:hover{text-decoration:underline}
    .mbt-s .icomments:before{content:'\f086';padding:0 3px 0 7px;color:#fff}
    .mbt-s .idate{color: #ff0;padding: 9px 10px;font-family: Oswald;
        font-size: 12px;position: relative;top: -270px; left:-80px;
        background: #222;width: 23px;text-align: center;line-height: 1.8em;}
    .mbt-s .idate b{font-size:17px;}

  6. Make these changes

    • To change the black background color behind the title and date edit: #222
    • To change the yellow color of the slide title and date font edit: #ff0
    • To change the color of the comment link edit: #0080ff
  7. Save your template.
  8. Now go to Blogger > Layout
  9. Select "Add a Gadget"
  10. Choose "HTML/JavaScript" gadget
  11. Keep the title field empty and then paste the following code inside it:

    <script type="text/javascript">
    $(window).load(function() {
      $('.mbt-s').flexslider({
    animation: "slide",itemWidth: 600,itemMargin: 25,directionNav: true,touch: true,slideshowSpeed: 2500,pauseOnHover: true,animationSpeed: 700,});});

    </script>

    <div class="flexslider mbt-s">
    <ul class="slides">

    <!-- SLIDE 1 -->

    <li>
    <div class="flex-div">
    <div class="iFeatured">
    <a href="POST LINK"><img src="POST IMAGE" /></a></div>
    <div class="iline"><span class="iauthor"><img class="AUTHOR IMAGE" />AUTHOR NAME</span><span class="icomments"><a href="#comment-form">COMMENTS COUNT</a></span> </div><span class="idate">Jun <b>10</b></span><a class="mbttitle" href="POST LINK" target="_blank">POST TITLE</a>
    </div>
    </li>

    <!-- SLIDE 2 -->

    <li>
    <div class="flex-div">
    <div class="iFeatured">
    <a href="POST LINK"><img src="POST IMAGE" /></a></div>
    <div class="iline"><span class="iauthor"><img class="AUTHOR IMAGE" />AUTHOR NAME</span><span class="icomments"><a href="#comment-form">COMMENTS COUNT</a></span> </div><span class="idate">Jun <b>10</b></span><a class="mbttitle" href="POST LINK" target="_blank">POST TITLE</a>
    </div>
    </li>

    <!-- SLIDE 3 -->

    <li>
    <div class="flex-div">
    <div class="iFeatured">
    <a href="POST LINK"><img src="POST IMAGE" /></a></div>
    <div class="iline"><span class="iauthor"><img class="AUTHOR IMAGE" />AUTHOR NAME</span><span class="icomments"><a href="#comment-form">COMMENTS COUNT</a></span> </div><span class="idate">Jun <b>10</b></span><a class="mbttitle" href="POST LINK" target="_blank">POST TITLE</a>
    </div>
    </li>

    </ul></div>

  12. The above code will help you create three image slides. Each slide has the same code. You just need to change the required fields in this format:
    • Replace POST LINK with Post URL. It must start with http://
    • Replace POST IMAGE with the thumbnail URL. Make sure your image should be at least 600px in width.
    • Replace AUTHOR IMAGE with author image URL also called author avatar or profile image. This image could have a small size, say for instance less than 50px in width and height. Same size for width and height.
    • Replace AUTHOR NAME with author name of that post.
    • Replace COMMENTS COUNT with how many comments are posted on that post.
    • Replace Jun and 10 with month and day respectively of published date.
    • Replace POST TITLE with the textual title of the post.
    • To add an additional slide simply copy the slide code starting from <li> and ending at </li> and paste it just above </ul></div>.
  13. Finally click save your widget and you are all done!

Need help in installing Image Slider?

In my next post I will share how to create a dynamic random post slider for the first time with all of you. For the time being do kindly share your feedback on this static one. Let me know if you need any help or assistance by leaving your comments. I hope this slider will help you better feature your content on your homepage to engage your blog visitors even more. Wish you a great blogging experience. Peace buddies! :)

How to Know if You�re Hiring a Reputable Web Design Agency?

How to hire a web design agencyAfter the launch of our web development and mobile app development agency, many of you asked us how to know if a web design company can be trusted and what are some of the things that must be kept in mind while hiring a reputable web design agency that may provide high quality service at a competitive price. Did you know there are over one billion websites on the world wide web? While each of these websites has its own design, it goes without saying that some are better than others. A good web design requires a good team of web designers. Today we will discuss in detail five basic advices that  would help you to kick start your online business without worrying about the challenges that come during the web design process.
Just recently several of my friends kick started their online business firms, some of them are located in USA, Australia and UK. I asked one of my friends who recently started Sydney web design agency in Australia and took his advice on how to identify trustworthy web design agencies from those which are unprofessional or untrustworthy. I also asked some of my colleagues in USA who work with different software houses for their precious views and advices. Based on this research I am sharing below five points of experienced and credible advice that will point you towards the right provider.


1. Visit Their Website!

view their websiteIt doesn�t get any easier than this. Visit the website of the company you are considering. While there, focus on everything from the layout to the color scheme. If you like what you see, you�re on the right track. If you don�t, it�s time to move on.

2. Read Customer Reviews

read customer reviewsIn today�s day and age, it�s easier than ever to dig up information on any type of company. This is particularly true of web design agencies, where it seems like the top providers have five star reviews spanning many rating services. Positive reviews will go a long way in putting your mind at ease.

3. Ask For References

The best web design companies have no problem providing several references. In fact, they�ll want you to check with past clients before moving forward.

Ask for references

Conversely, there are companies that do whatever they can to steer you away from this. Rather than provide references, they come up with a variety of excuses as to why they are unable to do so.

4. Discuss The Details

Even if you aren�t part of the web design industry, it never hurts to become familiar with the lingo. As you discuss your project with the company, this will allow you to better understand if they truly know what they�re talking about.

Discuss the details

From above the fold to XHTML, there are plenty of words and phrases that the top web design agencies will throw into the conversation. You may not understand each one, but this shows that the company is knowledgeable on their subject matter.

5. It�s Not All About Price

There is no denying the fact that you want to find a web design agency that provides high quality results at an affordable price.

It's not all about price

However, there�s something you need to remember: it�s not all about the money. If a company continually talks about price, telling you that they are cheaper than the competition, it should throw up a red flag. The cost to build a website can and will differ based on a variety of factors, from the scope of the project to the functionality to the programming. There will come a time when you talk numbers, but this shouldn�t be the end all.

Conclusion

Regardless of your industry or goals, it�s important to have a high quality website design that impresses your customers and prospects. There are many visually appealing designs out there, all of which can give you the inspiration you need. Once you have a basic idea of what you�re looking for, you can then begin your search for a web design agency. With the above advice guiding you, you�ll find it easier to compare companies in an attempt to make a decision that will suit you well.

Even if you�re in a hurry, even if you�re working on a tight budget, you never want to hire �just any� web design agency. This is an important decision, so you should treat it as such.  I hope these tips and advices may help you in making the right decision. Let me know if you have any queries :)

Blogger Slider: Display Recent Posts Dynamically

dynamic blogger sliderEver wondered how to display your most recent posts from a selected category inside a dynamic Image slider? Lets create a responsive content slider for BlogSpot blogs that may display recent posts from a specific label automatically. Without our Blogger JSON Feeds guide, building blogspot widgets would not have been that easy!

UPDATE: We just released Random Posts Slider Widget and a Static Slider For Blogger!

Image Sliders for blogs play a vital role in showcasing your featured content whether it be a static list of featured images linked to your bog posts or a dynamic/automatic list of recent posts from a specific label or a automatic list of random posts. We are sharing with you all for the first time, all these three amazing blogger sliders built using FlexSlider and Blogger JSON Feeds API. These blogspot widgets are rarely shared with all advanced functionality and we are pleased to develop them exclusively for blogger community. 

In the past we have developed and shared several static Content Sliders for blogspot blogs but this time we will learn how to make that content load dynamically instead of manually creating the featured content list and then displaying it.

See our previous sliders by following these links:

Features of Blogger Slider

Blogger Slider is an advanced widget equipped with these features:

  1. Author Avatar - Unique!
  2. Displays recent posts dynamically inside Slider. - Unique!
  3. Displays recent posts from a specific category/label.
    1. Slider with two animations: Slide & Fade - Unique!
    2. Clickable Comments Count
    3. Custom Date Format
    4. Clickable Animated Featured Image Thumbnails
    5. Option to increase or decrease Image Resolution for quality- Unique!
    6. Support for Third-party Images and YouTube Video thumbnails - Unique!
    7. Title Length is adjustable

    Most Responsive Content Slider For Blogger Blogs!

    Blogger slider is built using FlexSlider and it therefore automatically adopts the width of the parent container. Multiple breakpoints are added to ensure the slider fits to device screen size just perfectly. See the screenshots below

    [ SMARTPHONES ]

    responsive blogger slider


    [ TABLETS / IPADS]

    responsive blogspot slider


    [ DESKTOP / LAPTOPS ]

    responsive blogspot content slider

    Add Blogger Slider To Your Blogspot Template

    Follow these simple steps:

    1. Go To Blogger > Template
    2. Backup your template
    3. Click "Edit HTML"
    4. Just below <head> tag paste the following JS and CSS source links:

      <script src='http://ajax.googleapis.com/ajax/libs/jquery/1/jquery.min.js' type='text/javascript'></script>
      <link href='http://fortawesome.github.io/Font-Awesome/assets/font-awesome/css/font-awesome.css' rel='stylesheet'/>
      <link href='http://fonts.googleapis.com/css?family=Oswald' rel='stylesheet' type='text/css'/>
      <link href='https://cdnjs.cloudflare.com/ajax/libs/flexslider/2.6.1/flexslider.min.css' rel='stylesheet' type='text/css'/>
      <script src='https://cdnjs.cloudflare.com/ajax/libs/flexslider/2.6.1/jquery.flexslider.min.js' type='text/javascript'></script>

      Note: Do not add JQuery, FontAwesome, FlexSlider or Oswald source links to your template if you are already using them on your site.

    5. Next search ]]></b:skin> and just above/before it paste the following code:


      /*######### Blogger Slider By MyBloggerTricks #############*/
      .mbt-s{margin:0 5px;border:0;width:100%;overflow:hidden}
      .mbt-s .slides{list-style-type:none;margin:0 auto;padding:0}
      .mbt-s li{color:#fff;font-family:helvetica;font-size:12px;overflow:hidden;padding-top:10px}
      .mbt-s .flex-control-nav li{display:inline-block;margin:0 2px}
      .mbt-s .flex-control-nav a{text-indent:9999px;display:block;width:10px;cursor:pointer;height:10px;background-color:#000;border:1px solid #000;border-radius:0!important}
      .flex-direction-nav .flex-prev{left:-50px}
      .flex-direction-nav .flex-next{right:-50px;text-align:right}
      .mbt-s .flex-control-paging{display:none}
      .flex-direction-nav{position:relative;top:-250px}
      .mbt-s .flex-control-nav a.flex-active{background-color:#84db06;border:1px solid #90f128}
      .mbt-s .flex-div{margin:0 auto;display:block;padding:0!important;position:relative;height:370px}
      .mbt-s li a{color:#0080ff;text-decoration:none}
      .mbt-s i{color:#999;padding-right:5px}
      .mbt-s .iline{line-height:2em;margin:0;position:relative;top:-90px;background:#31363a;padding:3px 10px;display:inline-block}
      .mbt-s .icontent{line-height:1.5em;margin-top:5px}
      .mbt-s div span{margin:0 5px 0 0;display:inline-block;font-weight:400}
      .mbt-s .mbttitle{font-family:oswald;font-size:20px;color:#ff0;font-weight:400;text-decoration:none;position:relative;top:-90px;background:#222;padding:15px 10px;display:block}
      .mbt-s .mbttitle:hover,.mbt-s .itotal a:hover{color:#fff;text-decoration:none}
      .mbt-s .iedit a{text-decoration:none;color:#999;cursor:pointer}
      .mbt-s .iedit:before,.mbt-s .iauthor:before,.mbt-s .itag:before,.mbt-s .icomments:before,.mbt-s .idate:before,.mbt-s .itotal span:before{font-family:fontAwesome;position:relative;padding-right:8px;color:#fff}
      .mbt-s .iauthorpic{width:17px!important;height:17px!important;border-radius:50%;float:none;display:inline-block!important;margin:0;padding-right:3px;position:relative;top:3px}
      .mbt-s .iFeatured{overflow:hidden;position:relative;margin:0;padding:0;width:100%}
      .mbt-s .iFeatured a{background:none;padding:0;display:block;border:0px solid #eee;margin:0 -1px}
      .mbt-s .iFeatured img{height:305px!important;-moz-transition:all .3s;-webkit-transition:all .3s;transition:all .3s;border-radius:0;margin:0;padding:0;opacity:.7}
      .mbt-s .iFeatured:hover img{opacity:1;-moz-transform:scale(1.4);-webkit-transform:scale(1.4);transform:scale(1.4)}
      .mbt-s .icomments a{color:#0080ff;font-family:arial;font-size:12px}
      .mbt-s .icomments a:hover{text-decoration:underline}
      .mbt-s .icomments:before{content:'\f086';padding:0 3px 0 7px;color:#fff}
      .mbt-s .idate{color:#fff;padding:3px 4px;font-family:arial;font-size:11px}
      .mbt-s .idate:before{content:'\f073';padding:0 5px;color:#fff}

    6. Make these changes

      • To change the black background color behind the title edit: #222
      • To change the yellow color of the slide title font edit: #ff0 and to change the white color of the title on mouse hover edit: #fff
      • To change the color of the comment link eidt: #0080ff
      • The color can be in rgb or #hexadecimal, both work. Use our  Color Code Generator.
    7. Save your template.
    8. Now go to Blogger > Layout
    9. Select "Add a Gadget"
    10. Choose "HTML/JavaScript" gadget
    11. Keep the title field empty and then paste the following code inside it:

      <script type="text/javascript">
      $(window).load(function() {
        $('.mbt-s').flexslider({
      animation: "slide",itemWidth: 600,itemMargin: 25,directionNav: true,touch: true,slideshowSpeed: 2500,pauseOnHover: true,animationSpeed: 700,});});</script>

      <div class="flexslider mbt-s">
      <ul class="slides">
      <script type="text/javascript">
      //################### Defaults
      var ListBlogLink = "http://mybloggertricks.com";
      var ListCount = 6;
      var ListLabel = "Events";
      var TitleCount = 66;
      var ImageSize = 600;
      //################### Function Start
      function mbtslide(json) {
      for (var i = 0; i < ListCount; i++)
      { 
      //################### Variables Declared
      var listing= ListImage = ListUrl = ListTitle = ListImage = ListContent = ListConten = ListAuthor = ListTag = ListDate = ListUpdate = ListComments = thumbUrl = TotalPosts = sk = AuthorPic= ListMonth = Y = D = M = m = YY = DD = MM = mm = TT =  "";
      //################### Category
      if (json.feed.entry[i].category != null)
      {
      for (var k = 0; k < json.feed.entry[i].category.length; k++) {
      ListTag += "<a href='"+ListBlogLink+"/search/label/"+json.feed.entry[i].category[k].term+"'>"+json.feed.entry[i].category[k].term+"</a>";
      if(k < json.feed.entry[i].category.length-1)
      { ListTag += " ";}
      }
      }
      //################### URL
      for (var j = 0; j < json.feed.entry[i].link.length; j++) {
            if (json.feed.entry[i].link[j].rel == 'alternate') {
              break;
            }
          }
      ListUrl= "'" + json.feed.entry[i].link[j].href + "'";
      //################### Info
      TotalPosts = json.feed.openSearch$totalResults.$t;
      if (json.feed.entry[i].title!= null)
      {
      ListTitle= json.feed.entry[i].title.$t.substr(0, TitleCount);
      }
      if (json.feed.entry[i].thr$total)
      {
      ListComments= "<a href='"+json.feed.entry[i].link[j].href+"#comment-form'>"+json.feed.entry[i].thr$total.$t+"</a>";
      }
      ListAuthor= json.feed.entry[i].author[0].name.$t.split(" ");
      ListAuthor=ListAuthor.slice(0, 1).join(" ");
      AuthorPic = json.feed.entry[i].author[0].gd$image.src;
      //################### Date Format
      ListMonth= ["Jan", "Feb", "Mar", "Apr", "May", "Jun", "Jul", "Aug", "Sep", "Oct", "Nov", "Dec"];
      ListDate= json.feed.entry[i].published.$t.substring(0,10);
                               Y = ListDate.substring(0, 4);
                              m = ListDate.substring(5, 7);
                               D = ListDate.substring(8, 10);
                               M = ListMonth[parseInt(m - 1)];                      
      ListUpdate= json.feed.entry[i].updated.$t.substring(0, 16);
                               YY = ListUpdate.substring(0, 4);
                              mm = ListUpdate.substring(5, 7);
                               DD = ListUpdate.substring(8, 10);
                               TT = ListUpdate.substring(11, 16);
                               MM = ListMonth[parseInt(mm - 1)];  
      //################### Thumbnail Check

      if (json.feed.entry[i].media$thumbnail)
      {
      thumbUrl = json.feed.entry[i].media$thumbnail.url;
      sk= thumbUrl.replace("/s72-c/","/s"+ImageSize+"/");
      ListImage= "'" + sk.replace("?imgmax=800","") + "'";
      }

      // YouTube scan
      else if (json.feed.entry[i].content.$t.match(/youtube\.com.*(\?v=|\/embed\/)(.{11})/) != null)
      {
          var youtube_id = json.feed.entry[i].content.$t.match(/youtube\.com.*(\?v=|\/embed\/)(.{11})/).pop();
         
          if (youtube_id.length == 11) {
              var ListImage = "'//img.youtube.com/vi/"+youtube_id+"/0.jpg'";
              }
      }

      else if (json.feed.entry[i].content.$t.match(/src=(.+?[\.jpg|\.gif|\.png]")/) != null)
      {
      // Support For 3rd Party Images
      ListImage =  json.feed.entry[i].content.$t.match(/src=(.+?[\.jpg|\.gif|\.png]")/)[1];
      }
      else
      {
      ListImage= "'https://blogger.googleusercontent.com/img/b/R29vZ2xl/AVvXsEgtm0maNUr06C_jCvhDoLUkVnptgdxcrDZZu6uXi9IGh6IreJpMcY7Vcs4HP-ynBx46v8dBcA6Lk4Jhoy0TGbObxeJt3O6fnk1iWw1OAgEOBPQZQBEosJkkxc6iVuTMKCMa70UGC7-K9Do/s200/Icon.png'";
      }
      //###################  Printing List
      var listing = "<li><div class='flex-div'><div class='iFeatured'><a  href="
      + ListUrl+
        "><img src="
      +ListImage+
      "/></a></div><div class='iline'><span class='iauthor'><img class='iauthorpic' src='"+AuthorPic+"'/>"
      +ListAuthor+
      "</span><span class='icomments'>"
      +ListComments +
      "</span> <span class='idate'>"
      + D +
      " "
      + M +
      "</span></div><a class='mbttitle' href="
      +ListUrl+
      "target='_blank'>"
      +ListTitle+
      "</a></div></li>";

      document.write(listing);

      } }
      <!-- #### Invoking the Callback Function #### -->
      document.write("<script src='"+ListBlogLink+"/feeds/posts/default/-/"+ListLabel+"?alt=json-in-script&callback=mbtslide'></"+"script>");
      </script>
      </ul></div>

      Changing the following control options will help you customize blogger sider:

      • animation: You can select two values here. "slide" or "fade"
      • slideshowSpeed: You can set the speed of the slideshow cycling, in milliseconds
      • animationSpeed: You can also set the speed of animations, in milliseconds
      • pauseOnHover: Pause the slideshow when hovering over slider, then resume when no longer hovering
      • If you don't want to use the title then delete the yellow highlighted code.
      • ListBlogLink : Insert your Blog URL here
      • ListCount : Decide how many posts do you wish to display.
      • ListLabel : Insert your blog label here. Remember that labels are case sensitive. Therefore type it exactly as it is shown in your browser address bar.
      • TitleCount : Choose how many characters to display in slide title.
      • ImageSize : You can control the resolution or aspect ratio of thumbnails by editing ImageSize = 600; where the value 600 means that you want your images to be within 600 x 600 pixels in dimension.
      • /-/"+ListLabel+" Delete this line if you wish to display latest posts of your blog without mentioning a label
    12. Click Save and you are all done!

    Need Help In Installation of Blogger Slider?

    I just hope you may find this cool slider widget useful and easy to apply. Let me know if you need any help during the installation process of this content slider. You are most welcomed to post your questions in the comment box below. In our next tutorials we will share how to create Random Posts Content Slider for blogger.

    Stay tuned and keep customizing your blog to take it to the next level! =)