How To Setup AdSense Page-level ads in BlogSpot?

setup adsense page-level ads in blogspot blogsPage-level ads have been rolled out recently and now available for use for all webmasters and bloggers. Page-level ads enable you to display AdSense ads on your blogger mobile templates. It helps you monetize your mobile templates just like you monetize mobile apps with Google Admob Ads.

Some interesting facts about Page-level Ads:

  • Shown by AdSense at optimal times to help increase revenue and provide a good user experience
  • Two new ad formats: anchor/overlay ads and vignettes
  • Don�t count towards your 3 ads per page limit - You can use them along with your content and link units.
  • Only display on mobile-optimized sites
  • Optimized to help increase revenue
  • Mobile Responsive!

I will discuss in detail the available Page-level formats, how to add code to the blogger template, and how to test the ads to see if they really work on your sites.

Page-level Ad formats

Following are the two types of Page level ad formats that are available so far:

Anchors

Anchor or overlay ads are mobile responsive ads that stick to the bottom of the user's screen and can easily be dismissed using the toggle down button at its top.

adsense page-level ads in blogger sites

Once the ad loads, an anchor is being displayed at the bottom of page that displays the ad. Users can simply slide the bar down to dismiss the anchor.

Vignettes

Vignette ads are full screen mobile ads that cover the entire interface of the webpage. They work exactly same as Admob's Interstitial ads used in mobile apps for android and iOS.

adsense page-level ads in blogger templates

Vignettes Ads appear as a popup between page loads on your blog. The user has the choice to either tap on the ad and continue to its destination, or close it and return to the webpage. The direct call to action and larger size combine make Vignettes Ads a particularly effective form of mobile advertisement.

Note:

  • Vignettes ads are displayed when the user leaves a page, not when when they arrive on one, so the user doesn�t have to wait for them to load.
  • Furthermore, they're also limited in number per user to maintain a good user experience.

Implement Page-level ad tags in Blogspot Blogs

To setup these new revenue boosting mobile ads on your blogger templates follow these easy steps:

1 Log into your AdSense account

2 Follow this link

3 Switch on both Anchor/Overlay and Vignette ads by clicking the two toggle buttons

enable adsense page-level ads in blogger

4 After that scroll down and click the button which says "Get code"

enable adsense page-level ads in blogger

5 Copy the code

adsense page-level ads code

6 Now go to Blogger > Template > Backup your template

7 Click Edit HTML and search for this code </head>

8 Paste your Page-level code just above </head>

  • Note: In your Page-level code, make one modification. Replace the attribute async with async=''
  • If you don't make this modification, blogger will give you an error message.

Error parsing XML, line 1473, column 15: Attribute name "async" associated with an element type "script" must be followed by the ' = ' character.

9 Save your template and you are all done!

Test Page-level ads on your blogger template

  1. On your favorite mobile device, visit your blog to test Page-level ads.
  2. In the address bar of your mobile browser, add #googleads to the end of your blog's URL. For example in our case: www.mybloggertricks.com#googleads.
  3. Select the ad format that you want to test from the tabbed box that will appear just above your blog body..

Anchors and Vignettes Ads

      4.   See the ads in action!

Have you tried Page-level Ads yet?

Page-level ads were rolled out near October 2015 for specific locations but now they have been rolled out for all countries and publisher accounts. If you have already tried these new mobile optimized ads on your wordpress or blogger blogs then please share your experience with us and let us know how it effected your overall revenue.

If you have any questions related to the tutorial above, please feel free to post your queries below. Peace and blessings buddies! =)

Display Recent Posts With Featured Thumbnails in Blogger

recent posts widget with thumbnailsWe have discussed in detail how you can use JavaScript to extract data from Blogger JSON Feed API and use it to build gadgets such as "Recent Posts Widget" and "Recent Comments Widget". The JSON tutorial series would help a developer to create quality widgets for blogspot blogging platform. Today's tutorial will show you the end-product of what can be done using JSON feed for posts. I will share with you an advanced widget that will display recent posts in descending order (latest at top) along with post thumbnails, post summary, timestamp, comment count, label tag, author name and edit link. You can add it to your blogger blogs to display latest posts in a unique style. This is the first widget of its kind with so much features. See the demo below:

Update: A more compact, flexible and fully functional version of this widget has been released. Checkout:

DEMO - Look at footer

What is a Blogger Recent Posts Widget?

A recent posts widget displays your latest posts in descending order with newest at top. It shows a list of your latest blog posts along with thumbnails, post excerpt and post meta info. It works with all blogspot blogs. Copy the code and paste it inside a HTML/JavaScript gadget, that simple!

You can also use it to display posts by label by listing recent posts from a specific label. You can customize it to display posts in magazine style fashion with vertical, horizontal, gallery style listing. I will discuss all such possibilities in my coming tutorials. Developers at themeforest use the same method to create magazine style blogger templates. You will learn how to code it from scratch through our JSON series.

Full features are the following:

  1. Post Title
  2. Featured Image - With third party image support  and YouTube Thumbnails support
  3. Post summary
  4. Read more link
  5. Author Name
  6. Label/Category/Tag name
  7. Comments Count
  8. Publish date
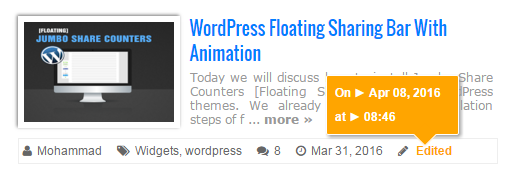
  9. Edit link tooltip that will show post Update Date and Time.
  10. Lightweight
  11. Fluid and responsive

Displays the following GIF preloader which spins and pulsates when the widget loads or when data is requested by browser from JSON feed.

preloader for blogger blogs

Once fully loaded the blog posts are displayed in descending order (Latest at top).

recent posts widget with thumbnails

See the difference in published date and updated date through the tooltip. A unique feature rarely seen before:

recent posts widget with tooltip

Lets get to coding!

Add Recent Posts Widget To Your Blog

Follow these easy steps to add this gadget to your blogspot blogs:

1 Go To Blogger > Template

2 Backup your template

3 Click Edit HTML

4 Paste the following code just above </head> tag

Note: This step is optional. Skip it if you have already added jQuery library source links to your blogger template.

<script async='' src='https://ajax.googleapis.com/ajax/libs/jquery/1/jquery.min.js' type='text/javascript'></script>

5 Next paste the following stylesheet links for FontAwesome and Oswald font just above </head>. Skip adding the links if you already have added them inside your templates:

<link href='http://fortawesome.github.io/Font-Awesome/assets/font-awesome/css/font-awesome.css' rel='stylesheet'/>

<link href='http://fonts.googleapis.com/css?family=Oswald' rel='stylesheet' type='text/css'/>

6 Now paste the following CSS code just above    ]]></b:skin>

/*############Recent Posts Widget##################*/

.mbtlist {list-style-type:none;overflow:hidden; padding:10px!important;}
.mbtlist li {margin:0px auto 20px auto; clear:both; color:#666; font-family:helvetica; font-size:12px; }
.mbtlist i{color:#999; padding-right:4px; }
.mbtlist .iline{line-height:2em; clear:both; border:1px solid #eee; margin-top:10px; padding: 0px 4px;   font-size: 12px;}
.mbtlist div span{margin:0 10px 0 0; display:inline-block;}
.mbtlist span {display:block; margin:5px 0px 0px; padding-right:5px;}
.mbtlist .icon {color: #999;font-family: verdana;font-size: 12px;text-align: justify;}
.mbtlist img {float:left; margin:0px 10px 10px 0px; border:6px solid #fff; padding:0px; width:150px; height:100px; box-shadow:-1px -1px 4px #777; }
.mbtlist .mbttitle {font-family:oswald; font-size:18px; color:#0080ff; font-weight:normal; text-decoration:none;    line-height: 1.4em;}
.mbtlist .mbttitle:hover, .mbtlist .itotal a:hover  {color:#00A5FF;}
.mbtlist .iedit a{text-decoration:none; color:#999; cursor:pointer}
.mbtlist .iedit:before, .mbtlist .iauthor:before, .mbtlist .itag:before, .mbtlist .icomments:before, .mbtlist .idate:before, .mbtlist .itotal span:before{font-family:fontAwesome; position:relative; padding-right:5px;}
.mbtlist .iauthor:before {content:'\f007';}
.mbtlist .itag:before {content:'\f02c';}
.mbtlist .icomments:before {content:'\f086';}
.mbtlist .idate:before {content:'\f017';}
.mbtlist .iedit:before {content:'\f040';}.mbtlist .imore {font-size:12px; font-weight:bold; text-decoration:none; color:#999;}.mbtlist .itotal {color:#333;  padding:5px 10px; border:1px solid #eee;}.mbtlist .itotal a {font-family:oswald; font-size:12px; font-weight:normal; color:#0080ff; text-decoration:none}.mbtlist .itotal span:before {content:'\f07c';}.mbtlist .itotal span font {padding:0px 3px; color:#333; font-family:georgia; font-size:15px; font-weight:bold}#mbtloading1{ margin: 20% auto;
background: url('http://downloads.mybloggertricks.com/Spin%20and%20pulsate.gif') no-repeat left center;width: 80px;height: 80px;}

/*------ CSS3 Tooltip Shortcode -------------*/
.tooltip1{outline:none;text-decoration:none!important;position:relative;color: orange!important; font-weight: bold;}.tooltip1:hover {border-bottom: none;}.tooltip1 strong{line-height:30px}.tooltip1 > span{max-width:300px;width:115px;padding:5px 8px;opacity:0;bottom:170%;left:0px; visibility:hidden;z-index:10;position:absolute;font-family:helvetica;font-size:12px;font-weight:bold;border-radius:2px;box-shadow:2px 2px 5px #999;-webkit-transition-property:opacity,margin-top,visibility,margin-left;-webkit-transition-duration:0.4s,0.3s,0.4s,.3s;-webkit-transition-timing-function:ease-in-out,ease-in-out,ease-in-out,ease-in-out;transition-property:opacity,margin-top,visibility,margin-left;transition-duration:0.4s,0.3s,0.4s,.3s;transition-timing-function:ease-in-out,ease-in-out,ease-in-out,ease-in-out}.tooltip1 > span img{float:right;width:110px;margin:0 0 30px 10px;padding: 0;border: none;}.tooltip1:hover > span{opacity:1;text-decoration:none;visibility:visible;overflow:visible;display:inline;margin-left:-90px}.tooltip1 span b{width:15px;height:15px;right:25px;bottom:-9px;display:block;position:absolute;-webkit-transform:rotate(-45deg);-moz-transform:rotate(-45deg);-o-transform:rotate(-45deg);transform:rotate(-45deg);display:none\0/;*display:none}.tooltip1 > span{color:#fff;background:orange;border:1px solid #ffffff}.tooltip1 span b{background:orange;border-bottom:1px solid #ffffff;border-left:1px solid #ffffff}

Edit the colors:

  • To change the blue color of the post title replace #0080ff with the link color of your choice and replace #00A5FF to change the link color for mouse hover.
  • To change the edit link color change orange
  • To change the tooltip color change orange with a hexadecimal color code of your preference.
  • To change the width and height dimensions of the featured thumbnail edit: width:150px; height:100px;

7 Save your template and you are almost done!

8 Finally go to Layout section and click "Add a Gadget".

9 Choose HTML/JavaScript widget and paste the following code inside it:

<div id="mbtloading1" ></div>
<script type="text/javascript">

//#################### Defaults
var ListBlogLink = window.location.hostname;
var ListCount = 5;
var ChrCount = 150;
var TitleCount = 66;
var ImageSize = 200;
//################ Function Start
function mbtlist(json) {
document.write('<ul class="mbtlist">');
for (var i = 0; i < ListCount; i++)
{
//################### Variables Declared
var listing= ListImage = ListUrl = ListTitle = ListImage = ListContent = ListConten = ListAuthor = ListTag = ListDate = ListUpdate = ListComments = thumbUrl = TotalPosts = sk = ListMonth = Y = D = M = m = YY = DD = MM = mm = TT =  "";

//################### Category
if (json.feed.entry[i].category != null)
{
for (var k = 0; k < json.feed.entry[i].category.length; k++) {
    ListTag += json.feed.entry[i].category[k].term;
if(k < json.feed.entry[i].category.length-1)
{ ListTag += ", ";}
}
}

//################### URL
for (var j = 0; j < json.feed.entry[i].link.length; j++) {
      if (json.feed.entry[i].link[j].rel == 'alternate') {
        break;
      }
    }
ListUrl= "'" + json.feed.entry[i].link[j].href + "'";

//################### Info
TotalPosts = json.feed.openSearch$totalResults.$t;
if (json.feed.entry[i].title!= null)
{
ListTitle= json.feed.entry[i].title.$t.substr(0, TitleCount);
}
if (json.feed.entry[i].thr$total)
{
ListComments= json.feed.entry[i].thr$total.$t;
}
ListAuthor= json.feed.entry[i].author[0].name.$t.split(" ");
ListAuthor=ListAuthor.slice(0, 1).join(" ");


//################### Content Check

ListConten = json.feed.entry[i].content.$t;
ListContent= ListConten.replace(/(<([^>]+)>)/ig,"").substring(0, ChrCount);

//################### Date Format

ListMonth= ["Jan", "Feb", "Mar", "Apr", "May", "Jun", "Jul", "Aug", "Sep", "Oct", "Nov", "Dec"];

ListDate= json.feed.entry[i].published.$t.substring(0,10);

                         Y = ListDate.substring(0, 4);
                        m = ListDate.substring(5, 7);
                         D = ListDate.substring(8, 10);
                         M = ListMonth[parseInt(m - 1)];                       

ListUpdate= json.feed.entry[i].updated.$t.substring(0, 16);

                         YY = ListUpdate.substring(0, 4);
                        mm = ListUpdate.substring(5, 7);
                         DD = ListUpdate.substring(8, 10);
                         TT = ListUpdate.substring(11, 16);
                         MM = ListMonth[parseInt(mm - 1)];   

//################### Thumbnail Check
// YouTube scan

if (json.feed.entry[i].content.$t.match(/youtube\.com.*(\?v=|\/embed\/)(.{11})/) != null)
{

    var youtube_id = json.feed.entry[i].content.$t.match(/youtube\.com.*(\?v=|\/embed\/)(.{11})/).pop();
   
    if (youtube_id.length == 11) {
        var ListImage = "'//img.youtube.com/vi/"+youtube_id+"/0.jpg'";
        }
}

else if (json.feed.entry[i].media$thumbnail)
{
thumbUrl = json.feed.entry[i].media$thumbnail.url;
sk= thumbUrl.replace("/s72-c/","/s"+ImageSize+"/");
ListImage= "'" + sk.replace("?imgmax=800","") + "'";
}

else if (json.feed.entry[i].content.$t.match(/src=(.+?[\.jpg|\.gif|\.png]")/) != null)
{
// Support For 3rd Party Images
ListImage =  json.feed.entry[i].content.$t.match(/src=(.+?[\.jpg|\.gif|\.png]")/)[1];
}
else
{
ListImage= "'https://blogger.googleusercontent.com/img/b/R29vZ2xl/AVvXsEgtm0maNUr06C_jCvhDoLUkVnptgdxcrDZZu6uXi9IGh6IreJpMcY7Vcs4HP-ynBx46v8dBcA6Lk4Jhoy0TGbObxeJt3O6fnk1iWw1OAgEOBPQZQBEosJkkxc6iVuTMKCMa70UGC7-K9Do/s200/Icon.png'";
}
//################### Printing List

var listing = "<li class='node"+[i]+"' ><a href="
+ ListUrl+
  "><img src="
+ListImage+
"/></a><a class='mbttitle' href="
+ ListUrl+
"target='_blank'>"
+ ListTitle+
"</a> <span class='icon'>"
+ListContent+
" ...  <a href="
+ListUrl+
" class='imore'>more �</a></span><div class='iline'><span class='iauthor'>"
+ListAuthor+
"</span><span class='itag'>"
+ListTag+
"</span><span class='icomments'>"
+ ListComments+
"</span><span class='idate'>"
+ M +
" "
+ D +
", "
+ Y +

"</span><span class='iedit'> <a class='tooltip1'>Edited<span><b></b>On ? "
+ MM +
" "
+ DD +
", "
+ YY +
" at ? "
+TT+
" </span></a> </span></div></li>";
document.write(listing);
}
document.write("<div class='itotal'><span> <a href='"+ListBlogLink+"/search'>View all <font>"+TotalPosts+"</font> posts</a></span></div></ul>");
}
</script>

<script>
var ListBlogLink = "http://www.mybloggertricks.com";
var ListCount = 5;
</script>

<script>
document.write("<script src='"+ListBlogLink+"/feeds/posts/default?alt=json-in-script&callback=mbtlist'></"+"script>");
</script>

<script>
document.getElementById("mbtloading1").style.display = "none";</script>

You can make these changes:

  • Replace http://www.mybloggertricks.com this with your blog URL
  • To increase or decrease the number of posts entries, edit: ListCount = 5
  • To reduce the length of title characters edit TitleCount = 66
  • To increase the image resolution quality (aspect ratio) if incase you wish to display large featured thumbnails then edit ImageSize = 200
  • To decide how many characters to display as post summary (excerpt) edit:ChrCount = 150

10 Save your widget and see it play in action! =)

Can You Guess How To Display Posts By Label?

At mbt we aim at educating the readers to learn the core basics of programming instead of just sharing a normal howto tutorial. In the above code you just need to make a simple change in order to display latest posts by a specific label. I have already discussed how to do that in the JSON series. Do read that and get back here proposing your solution mentioning all the necessary steps.

I will be waiting for your answers, I will share it in my next tutorial and link to your blog if you answered correctly. =)

Recent Comments Widget For Blogger - New!

Recent Comments Widget For BloggerToday we are releasing the most advanced "Recent comments Widget" for Blogger blogs which will display recent comments posted in your blog posts in a descending order i.e. latest at top. It is built from scratch using the same technique that we discussed in our Blogger JSON Feed series. If you have followed our JSON tutorials, you will know exactly how this widget functions and fetches data from blog feed. This gadget is extremely advanced, fast loading and show recent comments in a unique fashion. It works with both official and custom Blogspot templates and is fully mobile responsive.

DEMO - Added at Blog Footer

Recent Comments Widget Features:

A Blogger gadget is good only if it loads fast and makes the UI look even better. This is what we kept in mind while developing this widget that pulls recent comments from your blog feed in a asynchronous manner without much effecting blog loading speed.

Following are its features:

  1. Coded in JavaScript using Blogger JSON Feed API
  2. Displays author's profile thumbnail - Author Avatar
  3. Links author avatar to its Google+ profile
  4. Animated Image preloader
  5. Shows post title
  6. Shows comment date
  7. Shows comment excerpt (short description snippet)
  8. Read more link
  9. Lightweight
  10. Fluid and responsive
  11. Uses tooltips to display info

Displays the following GIF preloader which spins and pulsates when the widget loads or when data is requested by browser from JSON feed.

preloader for blogger blogs

Once fully loaded the comments are displayed in descending order (Latest at top). When user hovers mouse cursor on the commentator name, a tooltip will display info about the comment date and time.

recent comments widget for blogger

Hovering mouse cursor on folder icon will display the post title where the comment is posted:

blogspot recent comments widget

  • Question: If you look into blogger comment JSON feed, you will come to know that there exists no object for Post title then how come we were able to show the post title inside the recent comments list? 
  • Answer: We extracted the title by extracting/splitting words from the permalink and then using JavaScript to combine all those words to form a Title. I will explain in coming tutorials on how to do this.

Display Recent Comments With Thumbnails In Blogger

Read to add this cool fast loading widget on your blogs to display recent comments made by your blog readers? Lets get straight to work then!

1 Go To Blogger > Template

2 Backup your template

3 Click Edit HTML

4 Paste the following code just above </head> tag

Note: This step is optional. Skip it if you have already added jQuery library source links to your blogger template.

<script async='' src='https://ajax.googleapis.com/ajax/libs/jquery/1/jquery.min.js' type='text/javascript'></script>

5 Next paste the following stylesheet links for FontAwesome and Osald font just above </head>. Skip adding the links if you already have added them inside your templates:

<link href='http://fortawesome.github.io/Font-Awesome/assets/font-awesome/css/font-awesome.css' rel='stylesheet'/>

<link href='http://fonts.googleapis.com/css?family=Oswald' rel='stylesheet' type='text/css'/>

6 Now paste the following CSS code just above    ]]></b:skin>

/*############Recent Comments Widget##################*/

.mbtcmts{list-style-type:none; overflow:hidden; }
.mbtcmts li {margin:0px auto 20px auto; clear:both; color:#666; font-family:helvetica; font-size:12px;padding:0px;}
.mbtcmts i{color:#999; padding-right:4px;}
.mbtcmts .idate {display:block; font-family:arial; font-size:11px;text-align: left;padding:3px; margin:0 0 0px 40px}
.mbtcmts .icontent{ display:block; font-family:Georgia; color:#999; font-style:italic; line-height:1.5em;}
.mbtcmts .icontent a {color:#999; text-decoration:none; font-weight: bold;font-size: 16px;font-style: normal;}
.mbtcmts div{line-height:2em; clear:both; border-top:1px solid #eee; margin-top:5px;}
.mbtcmts span { margin:5px 0px 0px; padding-right:5px;}
.mbtcmts img {border-radius:100%; float:left; margin:0px 20px 20px 0px; border:1px solid #eee; padding:3px; width:50px; height:50px;box-shadow: 2px 2px 4px #ddd; }
.mbtcmts .icapital {text-transform:Capitalize; display:inline-block;}
.mbtcmts .ititle {font-family:oswald; font-size:14px; color:orange; font-weight:normal; text-decoration:none;}
.mbtcmts .ititle:hover {color:#666;}

.mbtcmts .idate:before, .mbtcmts .ipostTitle a:before{font-family:fontAwesome; position:relative; padding-right:5px;}
.mbtcmts .idate:before {content:'\f017'; color:#999}
.mbtcmts .ipostTitle a {text-decoration:none; color:#999}
.mbtcmts .ipostTitle a:before {content:'\f07c'; }

#mbtloading{
  margin: 20% auto;background: url('http://downloads.mybloggertricks.com/Spin%20and%20pulsate.gif') no-repeat left center;width: 80px;height: 80px;}

/*------ CSS3 Tooltip Shortcode -------------*/
.tooltip{outline:none;text-decoration:none!important;position:relative}.tooltip:hover {border-bottom: none;}.tooltip strong{line-height:30px}.tooltip > span{text-transform:capitalize;width:150px; padding:5px 5px;opacity:0;top:120%;left:0px; visibility:hidden;z-index:10;position:absolute;font-family:helvetica;font-size:12px;font-weight:bold;border-radius:2px;box-shadow:2px 2px 5px #999;-webkit-transition-property:opacity,margin-top,visibility,margin-left;-webkit-transition-duration:0.4s,0.3s,0.4s,.3s;-webkit-transition-timing-function:ease-in-out,ease-in-out,ease-in-out,ease-in-out;transition-property:opacity,margin-top,visibility,margin-left;transition-duration:0.4s,0.3s,0.4s,.3s;transition-timing-function:ease-in-out,ease-in-out,ease-in-out,ease-in-out}.tooltip > span img{float:right;width:110px;margin:0 0 30px 10px;padding: 0;border: none;}.tooltip:hover > span{opacity:1;text-decoration:none;visibility:visible;overflow:visible;display:inline;margin-left:-50px}.tooltip span b{width:15px;height:15px;left:30%;top:-9px;display:block;position:absolute;-webkit-transform:rotate(-45deg);-moz-transform:rotate(-45deg);-o-transform:rotate(-45deg);transform:rotate(-45deg);display:none\0/;*display:none}.tooltip > span{padding-top:10px;color:#fff;background:orange;border:1px solid #ffffff}.tooltip span b{background:orange;border-top:1px solid #ffffff;border-right:1px solid #ffffff}.mbtcmts .itotal {color:#333; padding:3px 3px 3px 10px; border:1px solid #eee; font-family:arial; font-size:12px;}
.mbtcmts .itotal i {font-style:normal;}
.mbtcmts .itotal span{font-family:oswald;  font-weight:normal; color:#333; text-decoration:none}
.mbtcmts .itotal span:before {font-family:FontAwesome; position:relative; content:'\f075'; }

To replace the orange theme of the widget, replace the yellow highlighted areas with a color of your choice. You can also replace them with hexadecimal color code.

7 Save your template and you are almost done!

8 Finally go to Layout section and click "Add a Gadget".

9 Choose HTML/JavaScript widget and paste the following code inside it:

<div id="mbtloading" ></div>
<script type="text/javascript">
function mbtcmts(json) {
document.write('<ul class="mbtcmts">');
for (var i = 0; i < ListCount; i++)
{
//################### Variables Declared
var listing= ListImage = ListUrl = ListDate = TotalPosts = ListTitle = ListImage = ListContent = ListConten = ListAuthor = ListTag = ListProfile = ListComments = thumbUrl = sk = ListMonth = Y = D = M = m =  "";

//################### URL
for (var j = 0; j < json.feed.entry[i].link.length; j++) {
      if (json.feed.entry[i].link[j].rel == 'alternate') {
        break;
      }
    }

if(json.feed.entry[i].link[2] != null)
{
ListUrl= "'" + json.feed.entry[i].link[j].href + "'";
}
else
{ListUrl = "'#'"}

//####################### Splitting URL into Title

if(json.feed.entry[i].link[2] != null)
{
var mbt_slit = json.feed.entry[i].link[j].href;
        var M_slit = mbt_slit.split("#");
        M_slit = M_slit [0];
        var K_slit = M_slit.split("?");
        K_slit = K_slit[0];    
        var B_slit = K_slit.split("/");
        B_slit = B_slit[5];
        B_slit = B_slit.split(".html");
        B_slit = B_slit [0];
        var T_slit= B_slit.replace(/-/g, " ").charAt(0).toUpperCase()+ B_slit.replace(/-/g, " ").slice(1).substring(0, 50);
        var Link_slit= T_slit.link(K_slit);
}

//################### Info
TotalPosts = json.feed.openSearch$totalResults.$t;
ListAuthor= json.feed.entry[i].author[0].name.$t;
var ListAuth = ListAuthor.split(" ");
var ListAuth = ListAuth.slice(0, 1).join(" ");

ListProfile= "'" + json.feed.entry[i].author[0].uri.$t + "'";

//################### Content Check

ListConten = json.feed.entry[i].content.$t;
ListContent= ListConten.replace(/(<([^>]+)>)/ig,"").substring(0, ChrCount);

//################### Date Format

ListMonth= ["Jan", "Feb", "Mar", "Apr", "May", "Jun", "Jul", "Aug", "Sep", "Oct", "Nov", "Dec"];

ListDate= json.feed.entry[i].published.$t.substring(0, 10);

                         Y = ListDate.substring(0, 4);
                        m = ListDate.substring(5, 7);
                         D = ListDate.substring(8, 10);
                         M = ListMonth[parseInt(m - 1)];                       
//################### Thumbnail Check

if (json.feed.entry[i].author)
{
thumbUrl = json.feed.entry[i].author[0].gd$image.src;
sk= thumbUrl.replace("/s72-c/","/s60-c/");
ListImage= "'" + sk + "'";
}

else
{
ListImage= "'https://blogger.googleusercontent.com/img/b/R29vZ2xl/AVvXsEgtm0maNUr06C_jCvhDoLUkVnptgdxcrDZZu6uXi9IGh6IreJpMcY7Vcs4HP-ynBx46v8dBcA6Lk4Jhoy0TGbObxeJt3O6fnk1iWw1OAgEOBPQZQBEosJkkxc6iVuTMKCMa70UGC7-K9Do/s200/Icon.png'";
}
//################### Printing List

var listing = "<li class='node"+[i]+"' ><a rel='nofollow' href="
+ListProfile+
  "><img src="
+ListImage+
"/></a><a class='ititle tooltip' href="
+ListUrl +
"target='_blank'><span><b></b>"
+ListAuth+
" Commented on � "
+ M +
" "
+ D +
", "
+ Y +
"</span>"
+ ListAuthor+
"</a> <i> posted in</i>  <span class='ipostTitle'><a class='tooltip'  href='"
+K_slit+
"'><span><b></b>"
+T_slit+
"</span></a></span><span class='icontent'>" + ListContent+" ...   <a href="+ListUrl+">  � </a></span><div></div></li>";
document.write(listing);
}
document.write('<div class="itotal"> <span> '+TotalPosts+' </span><i>delicious comments posted so far!</i></div></ul>');
}
</script>

<script>
var ListCount = 5;
var ChrCount = 90;
</script>
<script src="http://www.mybloggertricks.com/feeds/comments/default?alt=json-in-script&callback=mbtcmts"></script>
<script>document.getElementById("mbtloading").style.display = "none";</script>

You can make these changes:

  • Replace http://www.mybloggertricks.com this with your blog URL
  • To increase or decrease the number of comments, edit: ListCount = 5
  • To decide how many characters to display as comment summary (excerpt) edit: ChrCount = 90

10 Save your widget and see the magic in action! =)

What else do you want in Recent Comments Widget?

I have tried my best to add as many useful features as possible in this widget. Do let me know if you would wish more features and control options in the widget. One option that is often requested is to enable an option that could allow users to disable admin comments from displaying inside the widget. This can easily be achieved and I have discussed almost every basic of coding with JavaScript. I would love to see how many of you could propose the conditional statement that will disable blog author's comments from displaying inside the widget. After all what we aim for is always learning through practice and educating my readers is what I love to do. Do propose your suggestions, I will share the method once you have all tried. The solution will be shared here.

In my coming tutorials, I will discuss some core JSON basics that will help you do wonders. I will also explain how this widget is coded and how the logic works. Do post your queries for any help needed.

Keep blogging, keep sharing knowledge. Spread peace all around! God bless you all buddies! =)

How To Track Google Rank of Your Published Blog Posts?

Track Google Rank of your blog postsWith strong competition online, content writing optimization techniques keep on changing. Publishers today need to make extra efforts to keep a close eye on how well their content is performing in search results and track the Google Rank of their published content. Winning organic traffic today is no different from a turtle and rabbit race where the smart and consistent wins the race. If you are not tracking the SERPs ranking of your blog posts then you are giving an edge to your competitor. Maintaining a top position in search results is extremely important. 90% of all the clicks made on search pages include the top 20 search results. You need to make sure your content exists in this top list for your primary keyword. Google is continuously changing its algorithm for ranking content online, you need to keep an eye on the results of your SEO efforts.

We have already discussed how to optimize your blog posts and how to avoid making common SEO mistakes that most bloggers make. In today's tutorial I will guide you with how we normally track the Google rank of our content in order to make sure we always stay ahead of the competition.

Professional bloggers and webmasters today use WebTextTool which a DIY on-page optimization tool that helps you optimize your blog posts in real time while you are writing your blog post. It gives you realtime suggestions to improve your content and make it more SEO friendly. All our clients and co-authors have started using the webtexttool Page Tracker tool to track the SERPs ranking of our blog posts.

What is WebTextTool Page Tracker Tool?

The webtexttool Page Tracker allows bloggers to track the Google rank of their published content for a given keyword. It gives you insights on the position of your webpage, for the entered keyword, in Google. Once you have published your blog post, you can then use this tracking functionality to keep a close eye on how well your content is performing in Google search results pages. WebTextTool (WTT) will inform you with weekly updates and will keep you informed about the Rank status of your webpage.

Just recently we published a review on PublicityClerks and we wanted to see where do we stand in SERPs. For this after we were done optimizing the review post using WTT editor, we enabled the Page Tracking functionality to track its position in Google search pages.

Following are the steps you can follow to track the Google rank of any page you want:

1 Log in your WebTextTool account 

2 Create a New Page, choose your keyword and head straight to WTT editor. If you are new to WTT then you can read the following tutorial for a healthy start.

3 Towards the top-left of your webtexttool editor, click the Page tab.

4 From the drop down menu select Page Tracker (beta)

webtexttool page tracker tool

5 Inside the new popup window insert your Page URL that you wish to track and choose the Google domain. The Google Country Domain should be related to your desired targeted country for organic traffic.  choose google domain

The keyword is taken from the current page you are optimizing in webtexttool.

Note:
You do not need to write the entire article inside WebTextTool just to track its Google Rank. You can simply create a blank page with your Focus Keyword and then start tracking any blog post of your site which contains this keyword.

webtexttool page tracker tool

6 Click Start Tracking and WTT will then start tracking the rank and the optimization score. You can see the progress inside the Page Tracker popup anytime you want. Within next 15 minutes you will receive an email from WTT informing you about the Page score and Google Rank of your webpage.

Email Notification:

webtexttool email notification


Page Tracker Tool:

webtexttool page tracker tool

You can see from the results above that our post is amazingly ranking in 2nd Top position in Google and has a Optimization Score of 88% which we can improve further. I did a manual query in Google and was glad to found that our review is performing so well Alhamdulillah in SERPs:

publicityclerks google rank

Webtexttool updates the position of your webpage on a weekly basis. You can follow the ranking by logging into your account, opening the page in the webtexttool editor you set the tracker and selecting the Page Tracker option from the Page menu.

Keep Tracking your Pages to Rank Higher!

WebTextTool has greatly helped us in improving the search ranking of our published content. There were weak SEO areas which I personally was not aware of but today we know which areas to focus more on to make sure we improve our organic traffic by publishing high quality content with a higher SEO Score and Google rank. I hope WTT Page tracker tool may help you in better tracking your SERPs ranking and help you to keep a close watch on your competitors. Let me know if you need any help or assistance. Feel free to post your queries below.

Peace and blessings buddies and keep doing healthy blogging! =)

Blogger JSON Feed API - [Data Sheet]

blogger json feed apiYou have finally reached the stage where you can now easily create BlogSpot widgets and plugins using your blog feed. Blogger gadgets and templates are coded using Blogger JSON Feed API which provides you with enough information to extract any information from a blog's feed in JSON format. We have discussed the most detailed tutorial where you learnt the basics of parsing JSON in JavaScript. If you have followed all this tutorial series, you are ready to build your custom gadget and add it to either Blogger widget directory or add it to your client's sites. Today I will share a Data Sheet of all important JSON objects, arrays and elements that will help you easily locate important data using direct queries.

In programming all objects, elements or arrays have a relationship between each other that is managed in a tree like structure. Where there is a parent/Child or Master/slave or Tree/branch relationship or hierarchy. This is a standard approach to organize data so that it could easily be sorted, re-organized, easily located and updated. You blog feed is similarly written in both XML and JSON format, out of which the JSON is more easily accessible and prompt to browser requests.

Note: Click the Button below to see full list of topics under discussion.

Topics List

Do first read:

Link Under study

We will discuss the json data extracted for the following post

http://www.mybloggertricks.com/2016/03/WordPress-Floating-Sharing-Bar.html

Sample Blogger JSON Link:

http://www.mybloggertricks.com/feeds/posts/default?alt=json

Copy the Code inside it and paste it here:

http://jsonviewer.stack.hu/

Switch to "Viewer" mode to see the code in tree-like structure. You can then easily expand each node to find data of your interest.

blogspot json feed api

Below I have listed the Data Sheet for all JSON variables found in Blogger JSON Feed which you can use for direct access to important info related to your blog. You can find anything you want. You can run queries like:

  • Find the number of total posts published so far
  • Find the total list of all Labels used in the blog
  • Find Blog Title and meta Description
  • Find when was the blog last updated
  • Find information related to blog admin and authors
  • Find Post Published date and time
  • Find labels used inside the post
  • Access Post Title, Thumbnails used and Content written
  • Find total count of comments published inside a post
  • Extract short summary from your post content
  • Extract YouTube thumbnails from within the post
  • Find when was the post last edited
  • Find who wrote the post
  • Much more...

Note:

  • Objects are denoted with curly braces i.e. { }  and arrays with square brackets i.e. [ ].
  • "i" refers to index number and "j" refers to sub-index number.

JSON FEED API

OBJECT DESCRIPTION DATA
JSON Tells JSON version and encoding used.

version : "1.0"

encoding : "UTF-8"

feed Primary object for blog feed. All blog information resides here. refer JSON viewer..
json.feed.id.$t Displays your blog ID and CMS platform tag:blogger.com,1999:blog-8193278726666811965
json.feed.updated.$t Shows last update of your blog 2016-04-08T14:09:00.629+05:00
json.feed.category[ ] Shows array of all Labels or Categories used in a blog refer JSON viewer..
json.feed.category[i].term Shows the ith category In our case the [0] category index includes the label "SEO"
json.feed.title.$t Show blog title My Blogger Tricks
json.feed.subtitle.$t Show blog description Create your free blog today! Start blogging using our widgets, templates and SEO tips.
json.feed.link[ ] Includes info about 5 important links. Your blog URL, feed url in xml and json and an alternative link to your JSON feed URL using your blog Id. An alternate link to our Blog Feed would be: "http://www.blogger.com/feeds/8193278726666811965/posts/default?alt=json"
json.feed.author[ ] Shows array of blog authors or admins. Includes your Google+ profile link, thumbnail link and author name. refer JSON viewer..
json.feed.author[i].name.$t Show the ith author's name. Depending on how many blog co-authors you have. Mohammad Mustafa Ahmedzai
json.feed.author[i].uri.$t Show the ith author's Google+ profile link https://plus.google.com/107381172453188253394
json.feed.author[i].gd$image.src Show the ith author's profile Thumbnail link //lh4.googleusercontent.com/-f8qSqNLtpBU/AAAAAAAAAAI/AAAAAAAAQeo/f7nmpa1_dQ0/s512-c/photo.jpg
json.feed.generator Gives info about Blogger platform version being used.

version : "7.00"

uri : "http://www.blogger.com"

$t : "Blogger"

json.feed.openSearch$totalResults.$t Show total posts count published so far 1463
json.feed.openSearch$startIndex Searching of items start from index number 1. 1
json.feed.openSearch$itemsPerPage Searching can be done for recent 25 items. For searching more than 25 items, we need to pass the attribute max-results inside the JSON feed URL. 25
json.feed.entry[ ] Shows array of all your blog posts. All details related to your posts will be listed inside it refer JSON viewer..
json.feed.entry[i].id.$t Shows the ith post ID tag:blogger.com,1999:blog-8193278726666811965.post-2069161432742150449
json.feed.entry[i].title.$t Shows the ith post title WordPress Floating Sharing Bar With Animation
json.feed.entry[i].published.$t Shows time published of the ith post 2016-03-31T18:41:00.000+05:00
json.feed.entry[i].updated.$t Shows when the ith post is updated 2016-04-08T08:46:07.907+05:00
json.feed.entry[i].category[] Shows array of post categories/labels refer JSON viewer..
json.feed.entry[i].category[j].term Shows the jth category of the ith post Widgets
json.feed.entry[i].summary.$t You will see this node only if you have set "Site Feed" length to "Short" or "Until Jump Break" in your Blogger dashboard settings.

This node will show a short snippet description of your post content. The content before jump break.

blogspot sitefeed settings
Will display blog content excerpt here.
json.feed.entry[i].content.$t Show post content Will display all Full post content here.
json.feed.entry[i].link[ ] Links array of a post. Includes the comment form link, feed link, post link and title. refer JSON viewer..
json.feed.entry[i].link[j].href Show the jth link of the ith post http://www.mybloggertricks.com/2016/03/WordPress-Floating-Sharing-Bar.html
json.feed.entry[i].link[j].title Show the jth title of the ith post WordPress Floating Sharing Bar With Animation
json.feed.entry[i].author[] Array of post authors refer JSON viewer..
json.feed.entry[i].author[j].name.$t Name of the jth author on the ith post Mohammad Mustafa Ahmedzai
json.feed.entry[i].author[j].uri.$t Shows Profile Link of author profile https://plus.google.com/107381172453188253394
json.feed.entry[i].author[j].gd$image.src Image uri of the jth author profile on the ith post //lh4.googleusercontent.com/-f8qSqNLtpBU/AAAAAAAAAAI/AAAAAAAAQeo/f7nmpa1_dQ0/s512-c/photo.jpg
json.feed.entry[i].media$thumbnail.url Shows thumbnail image on the ith post. in 72x72 resolution https://lh3.googleusercontent.com/-bg86VxwQanE/Vv0TXQ91pPI/AAAAAAAAQoE/RSTmPzYrkrs/s72-c/image11.png?imgmax=800
json.feed.entry[i].thr$total.$t Show total count of threaded comments 3

This is was the most comprehensive Data sheet about blogger JSON Feed API. I hope this is self explanatory and may help you better understand the core basics of blogger widget development. In coming days, I will release two advance widgets for post feed and comment feed to give you a clear idea of what could be done using the data sheet above. Stay tuned. Do post your queries and feel free to ask for any help needed. Always here! =)